


03 August 2023
|
 Fitting a roof rack will dramatically increase your load space
: credit: © Tom Critchell
Fitting a roof rack will dramatically increase your load space
: credit: © Tom Critchell
Here's how to boost your Land Rover’s carrying capacity in half a day
Need to know
Time: 4 hours
Cost: See below
Difficulty: 3 out of 5
Models: 2020-on Defender L663.
Tools: Socket and spanner sets, screwdrivers, trim tool, file, saw, Allen keys, tape measure, knife.
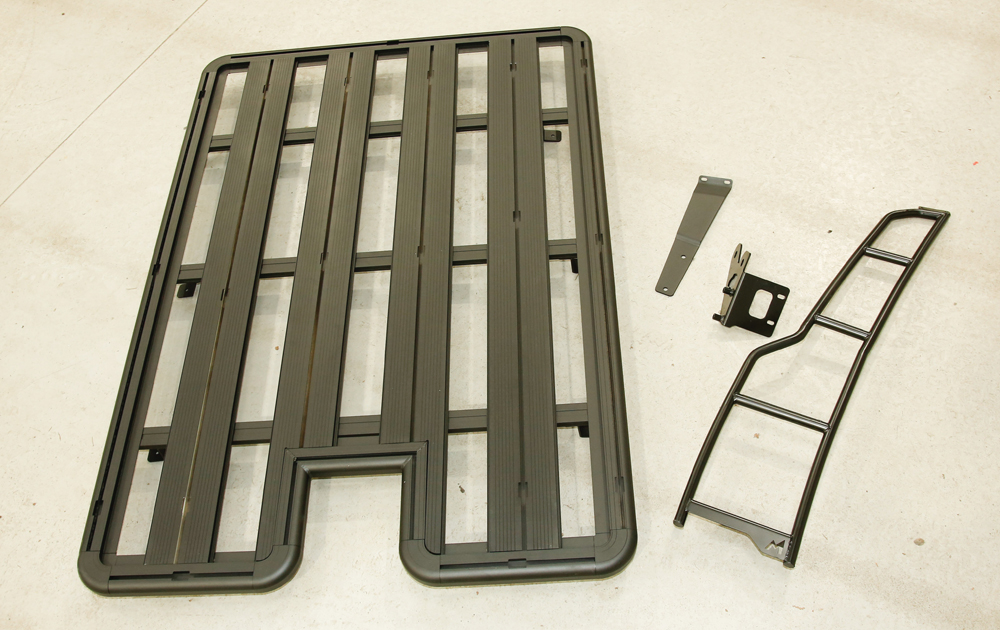
Parts and costs: Aluminium roof rack (TF8005 90, TF8006 110) £TBA; Rear access ladder (TF8017) £TBA.
Work safely: Wear safety glasses or a face shield when cutting plastic. Exercise caution when using a step ladder and only do so on flat ground.
Contact: Terrafirma4x4.com
See also part 1: Fit a discreet winch
Whether you like pointing your Land Rover at far-flung horizons as regularly as possible or enjoy the simple pleasure of a Sunday tip run, there’s a lot to be said for adding a roof rack.
In the instance of the former, it gives a sturdy base to mount a rooftop tent and awning as well as things like an extra spare wheel, jerrycans, jack and any other pieces of expedition kit there may not be space for inside the Land Rover. In the case of the latter, it means you can strap bulky, messy objects to the roof without getting the interior all mucky and smelly.
Once upon a time a roof rack would knock 20 per cent off your fuel economy and whistle like a boiling kettle at anything over 25mph. Thankfully, the latest breed of aluminium roof racks – like this Terrafirma one – are far sleeker and fit closer to the roof than those from days of yore. While MPG will still suffer slightly over not having one fitted at all, the low profile of modern roof racks has a significantly smaller impact because of being more streamlined, and wind noise is also much lower.
The rack and ladder we’re fitting today are going on to a new Defender 90, but Terrafirma offers a huge range of racks and accessories for almost every Land Rover model, and the fitment is similar, especially to those with OE roof rails. Let’s get started.
Top roof rack tips
As previously mentioned, Terrafirma’s range of expedition accessories – including roof racks and ladders – spans the Land Rover range and also includes options for other popular models such as the Discovery 3 and 4 and original Defender. The rack we are fitting today goes on top of OE roof rails, but other styles often clamp onto the gutters that run around the edge of the roof. There are loads of brackets and accessories available to secure and detach all sorts of kit quickly and easily, but some are specific to certain types of rack, so check before buying. Also consult your vehicle’s handbook for maximum roof loading weight, and be sure not to exceed it.

A flat-pack rack: The Terrafirma aluminium racks come in a smaller box than you might expect, and that’s because you have to assemble them before fitting. It couldn’t be easier; simply slot the slats, corner pieces and edge rails together and secure with the included button-head screws.

Foot loose: Once the main body of the rack is put together, turn it over and attach the feet that will pick up on the Land Rover’s roof rails. Slide all four into the channels and nip the screws just tightly enough so that they don’t fall back out, but can still be moved by hand.

Position your brackets: If you already know what’s going on your rack, such as a rooftop tent, it’s easier to measure the spacing and fit the brackets now before installing the rack on the vehicle. Measure the footprint of your tent and set the brackets, then tighten the screws.

Heave-ho! Except there’s not much heaving, because it’s actually very light. With assistance, lift the roof rack onto the top of your Land Rover, taking care not to catch the paint. Sit it on top of the roof rails and measure front-to-back and side-to-side so that it’s central on the roof.

Anchor plates in: Using the same method as fitting the feet to the rack itself, drop the anchor plates into the wide slots in the roof rails and then slide them along to meet the feet. It’s important that the whole anchor plate is located in the rail, or the rack won’t be properly secured.

Measure twice… Double-check your front-to-back measurements, then fit the washers and nuts to the threads on the anchor plates and tighten them up. Once all four are tight the rack is locked in place, but can still move side-to-side for final adjustments if needed.

Tighten the feet: Get your tape measure back out one last time and be sure that the rack is central, then spin the washers and nuts on and tighten the feet to the base of the roof rack. That’s the rack fitted and ready for use, but you’ll need a way of getting up there. It’s ladder time.

Remove bumper fixings: On the L663, the rear bumper needs to come off to fit the lower bracket for the ladder. It’s less complex a job than the front, but there’s still a combination of trim clips, Phillips, 8mm and Torx screws to remove from underneath and inside the rear arches.

Carefully release: Once all the fixings are removed, flip the catches over each side to release the bumper corners. Open the rear door and use a wide flat-blade screwdriver or trim tool to unclip the top edge of the bumper from the retainers below the door aperture.

Clamp and unclip: Before the bumper can come off, there are a few more things to release. Clamp the washer fluid pipe that supplies the reversing camera jet and part the plastic joiner, then unclip the connectors for the parking sensors and rear camera and unplug them.

Lift bumper away: With everything released, the bumper cover can be lifted off the back of the Defender. There’s a small modification to do to the bumper shortly, so clean out any trapped mud and leaves and lay it down on a piece of cardboard or carpet to prevent scratches.

Unbolt plastic bracket: The nearside upper bumper bracket needs to come off to make way for the metal ladder mount – undo the two 10mm screws and lift it away. The plastic bumper brackets are in short supply from Land Rover, so make sure you keep the one you remove safe!

Undo towing eye bolts: The bulk of the ladder’s support will come from the two big bolts that hold the towing eye to the rear of the Defender’s body. Loosen and remove the two 18mm bolts on the left side of the eye – you may have loops like these, or a threaded boss which takes a screw-in eye.

Install lower bracket: With the old bracket and towing eye bolts removed, offer up the new ladder support bracket. It picks up on the holes for the four bolts you’ve already removed; refit the OE towing eye bolts, and fit the longer screws from the kit. Start by hand, then tighten.

Unclip outer finisher: A section of the bumper needs to be trimmed to clear the new ladder bracket before it can go back on. Use a trim tool to unstick the silver outer finisher from the bumper, then depress the tangs to release the corner piece from the main bumper cover.

Making the cuts: Use the template in the kit to mark the plastic on the bumper cover. Use a hacksaw or reciprocating saw to trim the plastic away, then clean up the edges with a blade and file. Trim the vertical face off the trim piece you removed from the main bumper.

Refit the bumper: Lift the main bumper back into place, connecting up the rear camera wiring and washer tube and PDC multiplug as you go. Flip the plastic keepers back over on each side and secure the bumper with the screws and trim clips you removed earlier.

Finish the finisher: Clean the old double-sided tape off the outer trim, then cut relief slots so that it clears the ladder bracket – refer to the template. Stick the new 3M double-sided tape strips onto the finisher but don’t peel the backing paper off yet. Test-fit the piece for clearance.
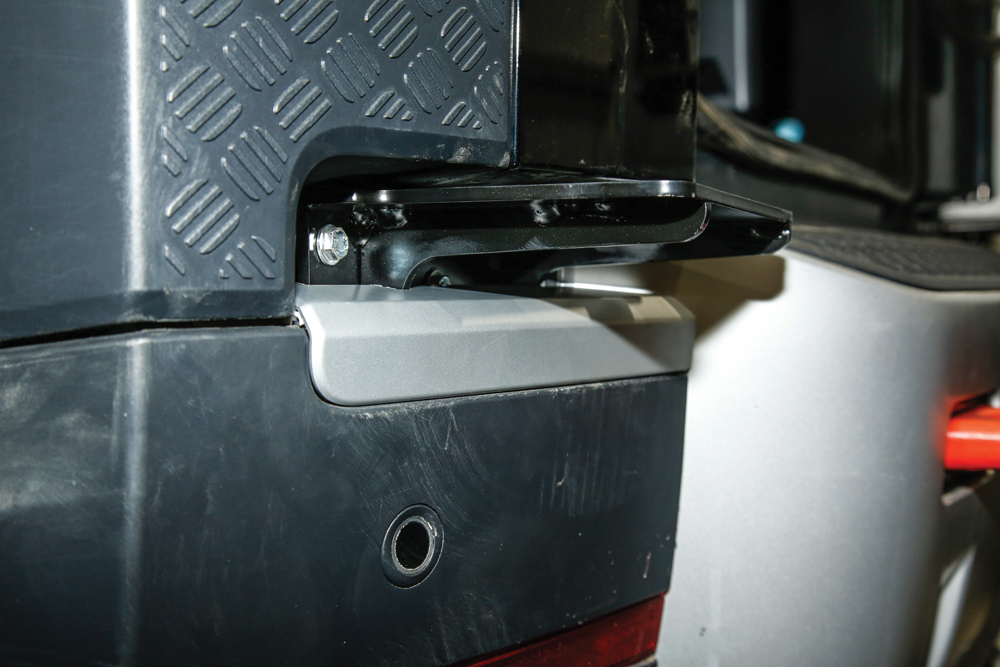
If you’ve done it right… You should be able to refit the outer finisher without it contacting the ladder bracket. Peel the backing paper off the 3M tape and fit the finisher for the last time. As you can see, the bodywork closes up nicely around the lower bracket and gives a clean finish.

Fit the top bracket: Slot the two threaded anchor plates into the nearside roof rail, and push them to the back. Offer up the top ladder bracket and fit the two button-headed screws with washers, starting them by hand into the anchor plates. Nip them up but don’t fully tighten just yet.
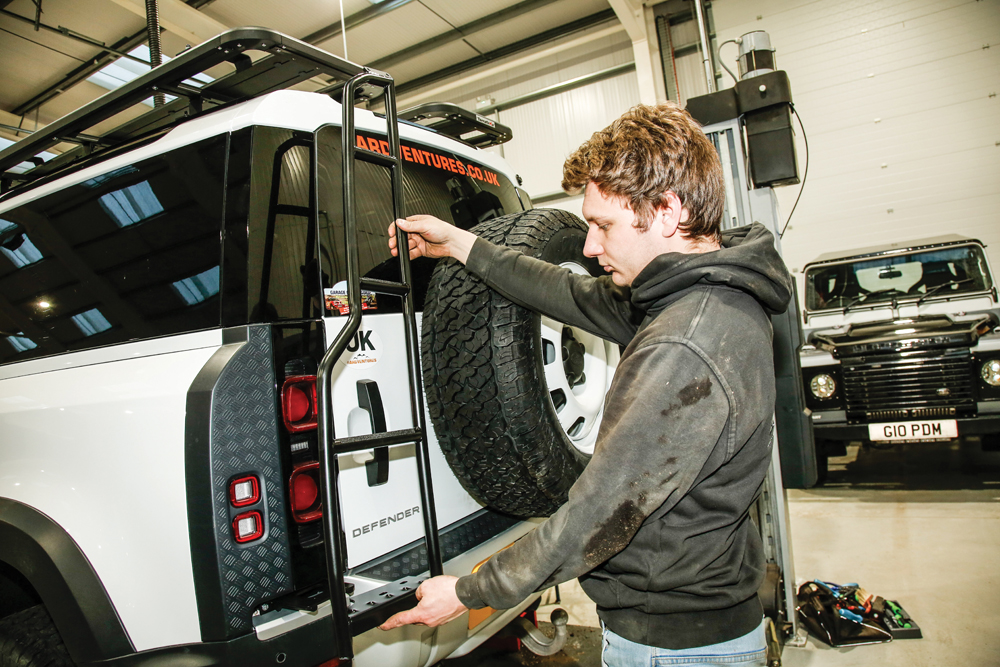
Offer the ladder up: Position the ladder against the top and bottom brackets, and use the screws, washers and nuts from the kit to hold it loosely in place. Don’t worry if it doesn’t line up perfectly just yet, as there’s still some movement in the top bracket to allow for adjustment.

Align and tighten: Position the ladder so that it follows the contour of the taildoor, making sure the door clears it comfortably when opened. Set the distance from the back of the body, then fully tighten the lower bolts and two top screws into the anchor plates inside the roof rails.

Final fixings: The last job is to fully tighten the two screws that hold the top of the ladder to the upper bracket. They wind into a threaded plate on the back of the ladder, so take care not to cross-thread them while tightening. Once tight, double-check the other fixings.
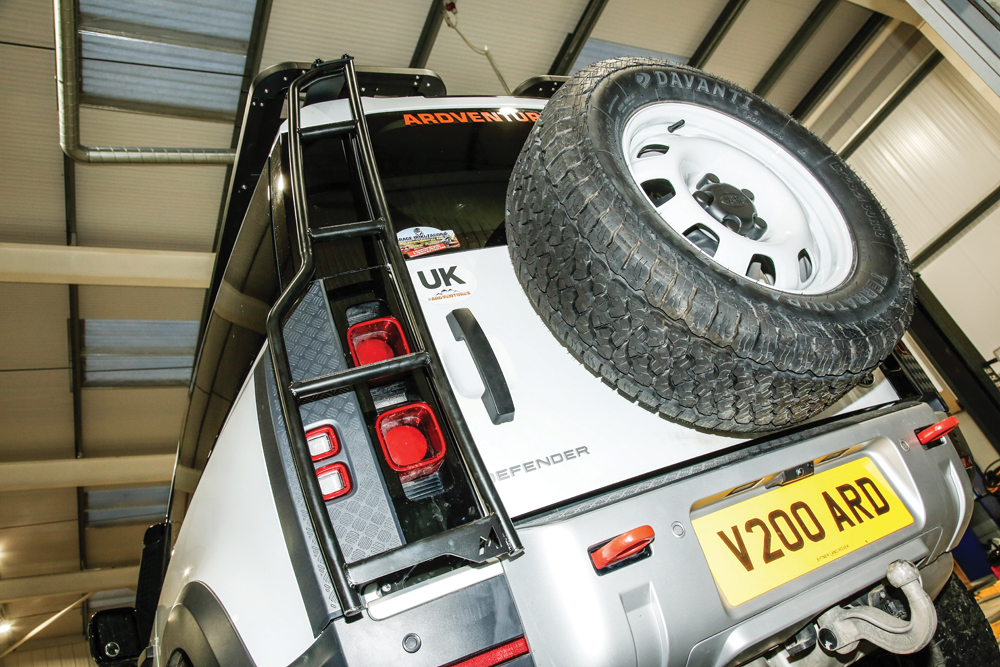
Going up in the world: You’re now all set to fit your roof tent, spare wheel, fuel or water cans, awning and jack ready for your next adventure. If you’re staying closer to home, you’ve now got loads of extra useful storage space for hauling whatever you need, whether for work or play.
Like to have your own Land Rover library?
Try our Budget Digital Subscription. You'll get access to over 7 years of Land Rover Monthly – that’s more than 100 issues plus the latest digital issue. All issues are fully searchable so you can easily find what you are looking for and what’s more it’s less than 10p a day to subscribe. Click here to find out more details and start enjoying all the benefits now.