


29 July 2022
|
 Turbo damage can occur when oil pressure fails
: credit: © Dave Barker
Turbo damage can occur when oil pressure fails
: credit: © Dave Barker
There are many causes of turbo failure but, when engine oil pressure fails, turbo damage can be instant. Dave Barker explains
Need to know
Time: 3 hours
Difficulty: 2 out of 5 stars
Models: TDCi 2007 onward
Tools needed: General workshop tools including 8, 10, 13 mm spanners and sockets, plus extension bar.
Parts used: Garrett turbocharger (LR042752X), new genuine Land Rover replacement, around £1400, non-genuine around £1000; Gasket oil drain, (1331076) 88p; Copper sealing washer x2 (ADU6847L,), 16p each; Exhaust stud nuts x3 (WYH50060/LR 014199), 15p each; Exhaust stud (LR009704), 32p
Work safely:
• Before working underneath a vehicle, ensure it is securely supported using equipment that is appropriately rated for the job and is in good order.
• Wear protective gloves or barrier cream to protect the skin from oils and sharp edges of components.
• Allow the turbocharger and the exhaust system to fully cool before working on them.
Contact: Maddison 4x4, Water House Farm, Station Road, Topcliffe near Thirsk, YO7 3SG. Tel: 01845 587407, maddison4x4.com.

Failure of engine oil pump led to damaged turbo
When Land Rover first fitted a turbocharger to the diesel engine in the pre-Defender Turbo D models it made a vast difference to the vehicle’s performance. Since then, the Defender range has enjoyed increased performance and driveability culminating in the TDCi (Ford Puma-engined) 2.2 litre which relies on its much improved and technically advanced variable vane turbocharger. The TDCi’s variable vane system makes it possible to vary the exhaust gas flow through the turbine to best suit the engine running conditions, improving performance and fuel consumption throughout the operating range.
The 2012 TDCi 2.2-litre Defender shown here had covered 96,000 miles when failure struck. The initial symptom was a whirling sound caused by a failed shaft bearing, and this in turn had damaged the vanes. The cause had been failure of the engine oil pump which provides lubrication to the turbo. Luckily, the driver reacted quickly and stopped the engine when the oil pump failed, saving the engine from internal damage. However, even the very short time without sufficient oil supply was enough to starve the turbo of oil and cause the damage. The oil pump, of course, is a separate story, but the only option for the turbo was to fit a new unit. It’s an easy job to replace the turbo, but an expensive one. Ensure all flange faces are clean, flat and free of damage before re-assembly.
Removing the damaged turbo

Locate the turbocharger: The turbocharger is situated on the right side of the engine and, despite being covered by a heat shield and pipe work, is accessible and easily replaced.

Lift off: The first job, with the help of an assistant, is to remove the Defender bonnet. This makes access easier and prevents you from bumping your head.

Undo and pull: After loosening its hose clamp, the main air outlet pipe between the air cleaner and turbocharger is removed, and the adjacent multi-plug unclipped from the air cleaner.

Remove and check: Two bolts holding the air intake duct to the turbocharger are released, and the pipe removed. We can now reach into the turbo and feel the bearing damage.

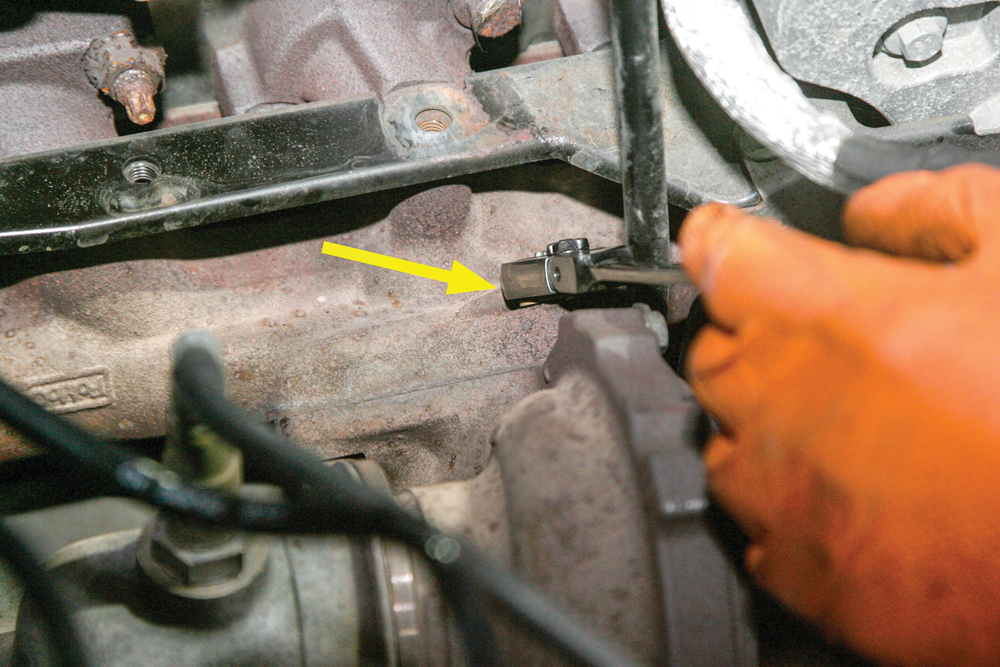
Carefully unclip: Two sensor cables are unclipped from the turbocharger heat shield. These are held in place by a small metal retaining clip; undo carefully, as it can snap off.

Unbolt: After releasing two bolts (arrowed) the turbo’s heat shield is lifted off its mounting bracket while feeding the oxygen sensor multi-plug through the hole in the shield.

Clear view of turbo: Next, the wiring connector at the actuator motor (which is part of the main turbocharger assembly) is unplugged and then pulled clear of the turbo.

Remove: The single bolt holding the heat shield mounting bracket to the turbocharger is removed, then this intercooler hose clip is released and the hose pulled away.

Oil in: The oil supply pipe banjo fitting on the top of the turbocharger is unbolted. Two copper seals on the banjo are discarded. New seals will be fitted on assembly

Oil out: Likewise, the oil outlet (return) pipe, located underneath the turbo and held by two bolts, is disconnected and the gasket is then discarded and will be renewed.

Release the clamp: The securing bolt that clamps the turbocharger’s exhaust gas outlet to the exhaust pipe can now be undone and the exhaust clamp removed.

Studs and nuts: The turbocharger is secured to the exhaust manifold by three studs and nuts. We tackle the two under the manifold first. Normally these studs stay in the manifold.
Top nut: The top manifold stud (arrowed under spanner) normally stays attached to the turbocharger, so a new stud will be fitted to the new turbo before it is installed.

Allow for movement: In order to move the exhaust to release the turbocharger, two bolts holding the catalytic converter/DPF assembly to the support bracket are removed, working from under the Defender.

Remove bracket: The securing bolts which hold the catalytic converter/DPF support bracket into position are now undone and the bracket is removed.

Lift out: The exhaust system can now be pushed downward, thus giving enough room to lift the turbocharger assembly away from the exhaust manifold and out of the engine bay.

The damage: With the old turbocharger on the bench, turn the shaft radially – evidence of severe damage to the shaft bearings.
Installing the new turbo

New turbo: The replacement Garrett turbocharger is supplied as a complete unit, full sealed. It’s ready to fit, apart from a new upper manifold stud needing to be screwed in.

Secure into position: The turbocharger is located, engaging the exhaust manifold studs, and the three new nuts are fitted and tightened to torque. Protective covers are now removed.

Seals and gasket: The oil supply pipe is reconnected using new sealing washers and torqued to 35 Nm. Below, the return pipe flange is re-bolted with a new gasket to 10 Nm.

Clamp together: The clamp is refitted to connect the exhaust pipe to the turbo (renewing the gasket if originally fitted), and checking the alignment before tightening.

Re-secure: The securing bolts holding the support bracket into position are now refitted and the catalytic converter/DPF assembly is bolted back into place.

Push on: The intercooler air hose can now be fitted back onto the turbocharger. Once it is correctly in position the hose clamp can be tightened securing it in place.

Heat shield: After refitting the heat shield bracket, the oxygen sensor multi-plug and cable is fed back through the hole in the heat shield, which is then re-bolted to the bracket.

Clip in: Once the heat shield is in position, the two sensor wires are carefully clipped back into the small metal cable clamp on the side of the shield.

Bolt up: The air intake duct pipe is refitted (checking O-seal condition) and the two bolts tightened, followed by the air outlet pipe to the air cleaner assembly.

Plug and play: Lastly, the multi-plug to the turbocharger actuator motor, and the harness multi-plug to the air cleaner assembly are reconnected, and the bonnet refitted.
Budget Digital Subscription
Get access to over 7 years of Land Rover Monthly – that’s almost 100 issues plus the latest digital issue. The issues are fully searchable so you can easily find what you are looking for and what’s more it’s less than 10p a day to subscribe. Click here and start enjoying all the benefits now.