


20 July 2021
|
 : credit: © Trevor Cuthbert
Discs wear, calipers seize and the pads bind. Trevor Cuthbert explains how to put it all right
Time: Around 1 hour per side
Cost: £155.08 (both sides)
Difficulty: 3 / 5 stars
Models: Defender 90, 110, 130, Discovery 1.
Tools: General workshop tools, torque wrench., 13 mm and 14 mm Bi-hexagon sockets..
Parts & Costs: Brake disc x2, LR017953 all makes, £22, BLRC Ltd; oil seal x2, FTC47856, OEM, £3.20, BLRC Ltd; disc bolt x10, UYG500030, Britpart. £0.75, BLRC Ltd; Hub lock nut x2, RFD100000G, Britpart, £2.94, BLRC Ltd; brake caliper x2, SMC500240 /110, Britpart, £33.50, BLRC Ltd; caliper bolt x4, SYP500090, all makes, 85p, BLRC Ltd; brake pad set, SFP000270G, Britpart, £20.90, BLRC Ltd.
Work safely:
• Ensure the raised vehicle is stable on axle stands or vehicle lift and the remaining wheels in contact with the ground are chocked to prevent rolling back or forward.
• Wear protective gloves and safety boots.
• Avoid inhaling brake dust.
• Always renew brake components on both sides of the axle, never on one side alone.
• Wear ear protection when using impact to separate components.
• Drive with extra care for the first few miles after working on the brakes.
Contact: BLRC Ltd, blrcvehiclespecialist.co.uk, Tel: 02897 511763
Disc brakes are found on the front axle of all coil sprung Land Rovers, and on the rear axle from around 1994 onwards. The calipers are hydraulically actuated – when you press the brake pedal with your foot, the brake master cylinder pressurises the fluid, which pushes the caliper pistons out to press the pads against the brake disc.
Disc brakes have superior performance over drum brakes and are generally considered to be easier to service and require less maintenance. However, they do need to be inspected as part of routine servicing to check for various issues that can arise with
the system.
The brake discs can become damaged in several ways, including scarring, cracking, warping or excessive rusting. Scarring occurs when the brake pads are not changed before they reach the end of their service life and the pad’s steel backing plate meets the brake disc after the friction material has worn away. This metal-to-metal contact ruins the surface of the disc and is dangerous.
Cracking is mostly limited to drilled discs, which are not fitted to Land Rovers as standard, where small cracks may develop around the edges of the holes due to the disc’s uneven rate of expansion in severe conditions.
Excessive rusting can occur when the Land Rover is not used for an extended period of time. The contact area of the disc is usually kept clean by the action of the pads, clearing the small amount of surface rust that accumulates when parked for relatively short periods of time. However, excessive rusting can damage the pads when the brakes are reactivated.
The main problems that can arise with brake calipers is that one or more of the pistons can become seized due to corrosion. This will cause uneven pad wear and reduced braking efficiency. It can also help promote rusting and warping issues.
Note the wheel bearings on this vehicle are of the later type with end float set by a spacer, and the hub held with a single stake nut.
Inspection and assessment
It was immediately clear that this particular Land Rover was a neglected and somewhat abused example. As soon as the road wheels were removed, it was obvious from a visual inspection that the brake discs had worn down to become very thin.
On closer inspection of the calipers and brake pads, it was evident that one of the opposing pistons in each caliper was seized and the other one was doing the work.
The working piston had emerged much further from the caliper, and the brake pad on that side had worn down much thinner than the other one.
Without even measuring the disc, or removing the pads to inspect them, it was a straightforward conclusion that the complete braking system on both sides of the rear axle needed to be renewed.
First impressions

1. Initial lifting: The rear of the Land Rover is jacked up using a trolley jack, but we must not rely on this alone to hold it raised up.

2. Reducing the risks: A pair of strong axle stands hold up the back of the Defender in a safe and stable manner, so that work can commence of both of the rear hubs.

3. Not pretty: The road wheels are removed to reveal a fairly tired, dirty and rusty rear brake assembly; although both rear wheels were turning freely enough.

4. Far too slim: The rear brake discs are pitted with rust and very thin, having worn down to around 7 mm, well below their minimum recommended thickness of 11.7 mm.
Stripping the brakes
The mechanics of how disc brakes are dismantled and subsequently rebuilt are fairly straightforward. The way the system is put together is not complicated and, as long as each stage is carried out in the correct order, the job will progress smoothly.
The copper brake pipes here are going to be replaced but, if the brake pipes are being retained, it is a good idea to seal off the open end when it is unscrewed from the caliper. This means that only minimal brake bleeding will need to be carried out at the end of the job, rather than having to expel air from the complete system if all brake fluid has been allowed to drain off.
The male end fitting of the brake pipe can be easily sealed using an old female end fitted with a short piece of copper brake pipe whose end has been squeezed closed (similarly, use an old male end for open female ends, as on the front brakes on many models). It’s important to prevent dirt or rust getting into the open connectors of pipes and calipers if these items are to be re-used.
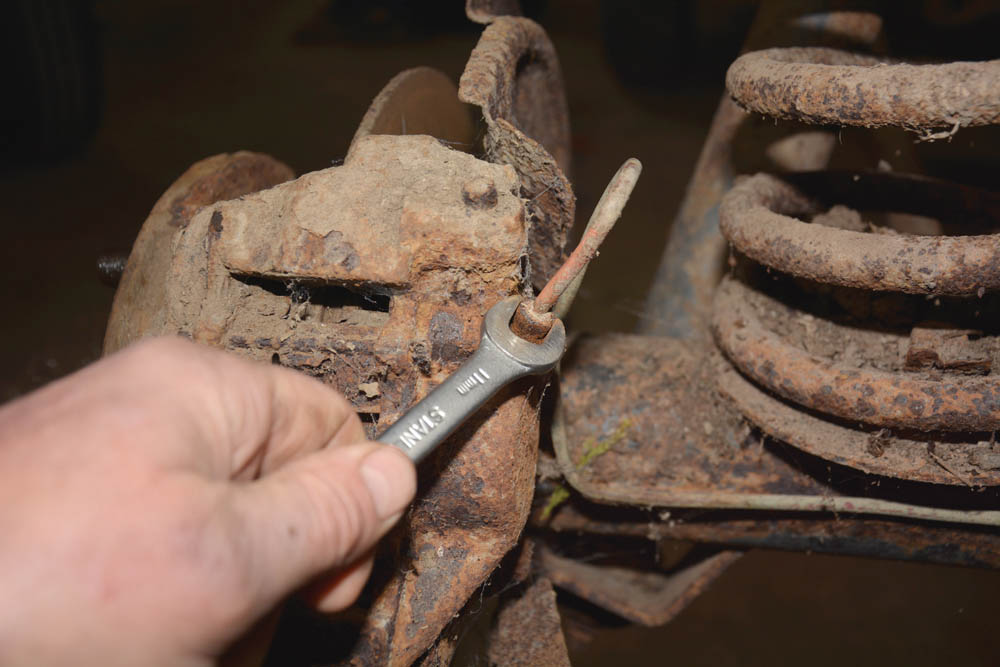
5. Disconnect: The metal brake pipe that feeds the brake fluid to the caliper is loosened and removed from the caliper using an 11 mm open ended spanner.

6. For comparison: Two different sizes of Bi-Hex (or 12 point) sockets (right) are needed for the caliper bolts and the brake disc bolts. Normal Hex socket shown on left.

7. A restricted location: The 13 mm Bi-Hex socket and wrench is needed to remove the two special bolts which hold the brake caliper to the rear axle mounting points.

8. Might require persuasion: With the caliper bolts removed, the old brake caliper is withdrawn from the brake disc, with the old pads still in place; in this case, quite easily.

9. Careful they don’t shear: The rear half shafts need to be withdrawn and are easily removed. They are held by five M10 bolts, which are loosened using a 17 mm socket wrench.

10. Pull it clear: Now that the bolts have been removed, the halfshaft can be removed from the axle. It may need a tap with a hammer to break the gasket seal.

11. 220 Nm to overcome: The hub nut (inset) requires a 52 mm box spanner, or better is this impact socket wrench – these later models are tightened to quite a high torque.

12. Wipe the grease: After removing the hub nut, the hub assembly can now be withdrawn, exposing the stub axle, which can be cleaned up and its condition inspected.

13. Get it ready: On the work bench, the outer wheel bearing is removed from the hub assembly and re-packed with grease for re-use, if it is in good condition.

14. Flip it over: A 14 mm Bi-Hex socket wrench is used to remove the five special bolts (12 point heads) that hold the brake disc on to the hub.

15. Clang, clang: Using a copper mallet, and wearing hearing protection, the hub and the brake disc are separated by bashing them apart, progressing around the circumference.

16. Lever it out: This is a good time to renew the hub oil seal, so the old one is removed by popping it out of the hub, using a pry bar.

17. Lubrication service: The inner wheel bearing can now also be removed and re-packed with grease, before fitting it back in position in the hub, assuming it is serviceable.
Assembling the new discs
Rebuilding the rear braking system is pretty much a reversal of the strip down, but is a much more pleasing experience – because now you’re working with shiny new parts and materials, instead of dirty, worn and rusty components.
It is important at every step to keep everything as clean as possible, thereby avoiding the introduction of mud, dirt or rust flakes into the hub or bearings.
It is also important to avoid oil or grease contamination of the brake pads and to clean the surface of the new brake discs of any storage grease, or contamination caused during the build up.

17. Avoid damage: After fitting the greased inner bearing, a new oil seal is positioned over the hub and tapped in using the old seal on top of it for protection.

18. Precise position: A brand new brake disc is set over the cleaned hub face, with the holes for the bolts aligned with the threaded holes in the hub.

19. A comparison: New disc bolts are recommended when the bolt heads become rusty, as they as quite prone to “rounding” due to the fine 12-point head.

20. Don’t jam it: The new brake disc bolts are fitted and progressively and evenly tightened down so that the disc seats evenly. They’re finally torqued up to 73 Nm.

21. Grease-packed: The hub assembly with the inner wheel bearing is placed back over the stub axle, being careful not to damage the oil seal on the stub axle.

22. Outer bearing: While supporting the hub in position, the spacer, outer wheel bearing and outer washer are refitted. The old hub lock nut is always replaced by a new one.

23. Stake the nut: The hub nut is tightened up to 220 Nm using a torque wrench. The nut is staked by deforming the raised lip onto the flat face of the stub axle to lock it in place.
Installing the calipers

24. Out with the old: The original calipers are old and seized, so have been replaced with brand new ones whose pistons and seals will ensure even braking and clean release.

25. Careful seating: The mounting faces are carefully cleaned smooth before locating the new caliper into position. The two caliper bolts need to be tightened to 82 Nm, and piping re-attached.

26. Pads in: Always fit new pads with new discs. These slide in easily, but if retaining the original calipers, the caliper pistons will need pushing in for clearance.

27. Springs and pins: New anti-rattle springs are fitted over the pads and pressed down while sliding the locating split pins through the aligned caliper and pad holes to secure the pads.

28. Locked in: The pins are locked by bending one leg of the split ends with pliers, ensuring they can’t vibrate out. Then the brakes can be bled in the usual manner.

29. Before driving: The bleeding process should have moved the pistons out against the new pads, giving a firm pedal. Drive with extra care until the pads bed to the new discs.
Want to see more helpful 'How to' features? Just click here.
Did you know that you can now get access to the entire archive of Land Rover magazine content with our brand new digital archive? You can enjoy all the issues since the launch of the magazine – use the search bar below to find features, reviews and other great content: