


13 May 2024
|
 Carb problems: replacing the damper piston can help
: credit: © Ed Evans
Carb problems: replacing the damper piston can help
: credit: © Ed Evans
Our experts answer your land rover queries
Discovery’s sinking pedal
My non-ABS 300Tdi Discovery is on its fourth brake master cylinder. I have replaced the brake balancer and the brake servo (all OEM) and the pedal still descends. No loss of fluid. Everyone says it has to be the master cylinder. Of the four I fitted only two have actually been non-ABS as I was provided with two ABS ones in error, but both of these have exhibited the same behaviour.
The brakes work, the vehicle stops, and then the pedal slowly descends, so if you don’t keep moving your foot down it will roll. The pedal does eventually seem to stop and hold, but by that time you are pressing very hard, the pedal is almost at the floor. The new servo has made it worse; the pedal starts much lower to begin with and goes down further and faster, in five seconds as opposed to 15. I put that down to the greater power of the new servo. Could it be a bulging flexi brake pipe? With the new servo it does actually go to the floor, the pedal sits much lower to start with, too. I can’t see how one adjusts that, and there is nothing in the manual. Stuart Boreham
Andrew Varrall replies: Brake pedal creep is common on a lot of cars. I have just been out and tested the creep on my Td5 Discovery and it takes around 15 seconds for the pedal to go down nearly to the floor as yours was doing. Obviously, I cannot compare how much force I have used compared to you, so cannot say for certain that it is completely normal.
You can test to make sure that none of the brake flexi pipes are bulging, and it is a straightforward job. The first obvious test is to inspect them while a helper is pressing the brake pedal, ideally while the engine is running to achieve maximum pressure. Even if you don’t see an obvious bulge, it is then worth clamping off each flexi hose in turn and seeing if the pedal travel improves. Make sure you clamp the hose at the top end (nearest to the master cylinder) and use proper brake hose clamps rather than pliers which can damage the internals of the hose. It might even be worth changing them as a matter of maintenance if you are uncertain of their age, because rubber does deteriorate over time.
If the hoses are serviceable, careful adjustment of the master cylinder pushrod may help, but it’s a tricky operation
Regarding the new servo giving a longer pedal travel, there is adjustment on the threaded section of the rod that pushes on the master cylinder. Be extremely careful with this adjustment because a tiny amount of movement makes a big difference, and you need to leave enough slack to allow for the brake fluid expanding when it warms up, I have seen these where the brakes end up slowly coming on during a long journey.
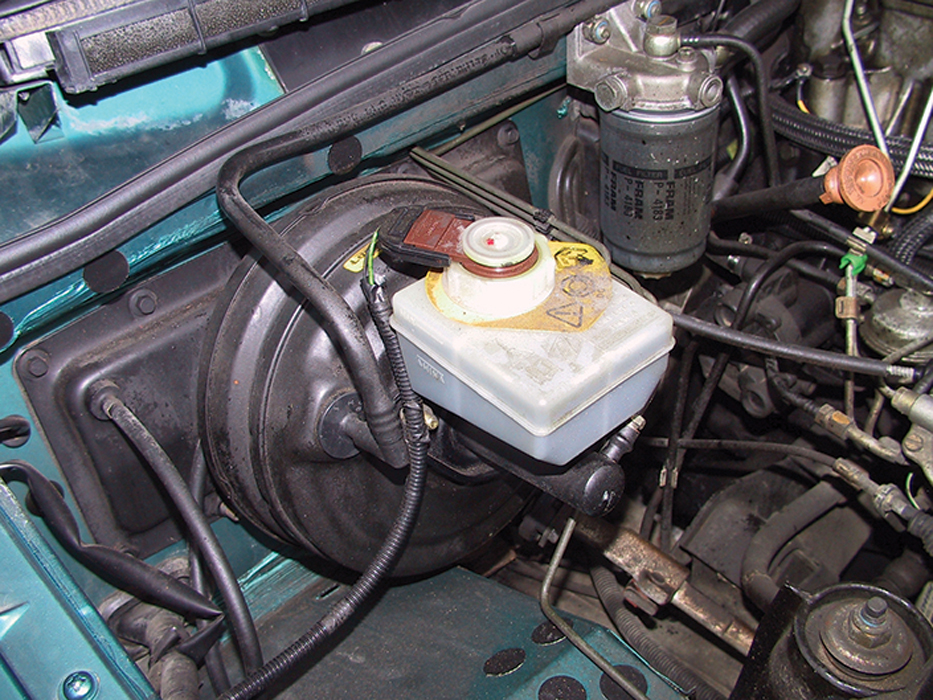
V8 carb check
Last year I bought an early V8 Defender with the 3.5-litre Rover engine, and I’m just giving it a full service. I’ve heard varying advice on what to do about the twin carburettors, in particular the dash-pots on the top. There are several views on what sort of oil, and how much, to put in the dash-pots. I’m reluctant to interfere with the carburettor adjustments as the car seems to be running well and was fully serviced by a Land Rover garage about a year ago. John Cameron
Ed Evans replies: If the engine is running well it would be best to leave the carburettor settings as they are. You’ll know this from driving, but there’s also a good indication on the spark plugs when you remove these for cleaning and re-gapping or replacement. As a basic guide, black deposit (soot) on the plugs suggest the engine is fuelling rich, a white deposit suggests weak fuelling. If the plugs show no excessive deposits either way, the idle speed is correct and all running characteristics are okay, then I would leave the mixture and throttle settings as they are. If you do need to adjust, it’s important to use an air flow meter to balance the carbs, also note the amount of turns you make on the adjustment screws so you can return to the original settings if needed.

A squeezy bottle with a fine tube allows controlled top-up of oil. By turning the bottle upright and squeezing, it can then be used to suck excess oil out
The carburettor dash-pots can lose oil over time. The oil in the dash-pot provides measured resistance to the movement of the carburettor piston, and thus controls the mixture, particularly during initial acceleration, by preventing the piston rising too quickly and too far. The oil level is checked by unscrewing the damper, lifting it out of the oil, then lowering it back in until you feel the resistance when it reaches the oil. At that point, the top of the damper screw should be about 12mm above the top of the dash-pot tube, equating to around 12mm depth of oil in the dash-pot. Add or remove oil as necessary to gain the correct depth, then screw the damper back in against the resistance. I advise using 20/50 engine oil in the dampers.

When the damper piston is replaced, resistance should be felt when the flats of the screw head are approximately 12mm from the dash-pot if the oil level is correct
Freelander is reluctant to open up
The bonnet pull on my 1999 Freelander 1 has become very difficult to operate and I have to pull it hard up, which is near impossible. Even when I do pull the release lever up far enough, the bonnet edge doesn’t seem to lift, though it is free, and I have to get my fingers or a plastic lever under the edge to ease it up. Do I need a new cable, I thought perhaps it has stretched? But I cannot see where the cable comes into the release mechanism on the front of the car and there seems no way of getting into the latch from above, below or behind. Do you have any ideas? Carole Wheeler
Ed Evans replies: The cables are not known for stretching, but they can become tight when dust and dirt gets inside the outer cable. First, using a large screwdriver or other lever, you can lever the latch back and forth to confirm that it is free. The latches are usually greased during services and that can attract dirt, so rinsing the latch with degreasant, letting it dry and then oiling it may help.

The bonnet latching height can be adjusted by easing the plate nut at the top of the spring, then using a screwdriver to turn the plunger anti-clockwise (for a higher bonnet setting), retightening the nut
The usual problem, though, is that dirt and corrosion between the inner and outer cables builds up over time and makes the inner cable tight to move, making the bonnet pull difficult to operate. WD40 often does the trick, squirting it up inside the outer cable from the bonnet pull in the footwell, and then in the opposite direction from the bonnet latch. Unbolt the latch plate from the bonnet shut panel and you will be able to see the cable, just, then feed the WD40 tube into the panel and blast the fluid into the outer cable from there. Repetitive working from the interior handle should then quickly free it up. The cable route goes from the latch, across to the right-hand side of the car (looking from the driver’s seat) along under the front panel. It then runs under the wing lip and down through the bulkhead to the bonnet pull in the cabin.
If this doesn’t work, you’ll probably need to fit a new cable, which is a reasonably simple job if you don’t do it by the book. The interior handle is removed by releasing its 13mm AF pivot bolt, but the bolt head is recessed in the handle so you’ll need to grind down a standard 13mm socket to get it onto the bolt head. The latch end of the cable is hidden in a tough plastic case that’s pop riveted under the shut panel. You may be able to drill the rivets out but, if your car has air conditioning, you should officially remove the air con condenser first to gain proper access. That’s a bind, mainly because a garage needs to first remove the refrigerant and then replace it after you’ve finished the job. But this was before the invention of the electric multitool with a vibrating blade that will cut through the rivets from the front of the car with the condenser still in place. I recommend buying one, though some owners simply chisel through the pop rivets, though that can make a mess. Whichever route you take, you’ll be able to remove the plastic cover or bend it out of the way to access the cable fitting at the latch.

The cable comes in from the left as seen here. Remove the two bolts to move the latch plate, and remove the centre grille below to access the plastic housing
Before removing the cable, tie a cord to the end so that when it has been removed you can use the cord to pull the new cable back through along the same route. It’s not much of a job really, and the cable is fairly cheap.
Going back to your question, you say you have difficulty initially lifting the bonnet, even though the latch has released. That sounds like the spring-loaded plunger attached to the bonnet is incorrectly set, so that the whole assembly is locking too tightly when the bonnet is closed. The plunger on the bonnet can be adjusted while the bonnet is propped open. Clean the end of the plunger to reveal the screwdriver slot. Insert a large screwdriver here to hold it steady, while releasing the large locking nut at the other end of the plunger (half a turn should do). Using the screwdriver, you can now unscrew the plunger to extend it. Just make one anti-clockwise turn and then hold it there while retightening the locknut. Try the bonnet. You may need to turn the plunger further out or back in a little to achieve the best shut setting.
But try easing the cable first and, if that fails, renew the cable. Either way, you may find the bonnet then releases properly without adjusting the plunger.
Fettling a classic range Rover tailgate window
I have a question concerning my Range Rover Classic top tailgate adjustment. Do you know how to adjust the rear hatch window catches, please? Malcolm Charlesworth
Achieving perfect closure on the Range Rover’s tailgate window requires time, patience and thought, followed by sympathetic use
Alisdair Cusick replies: There are five things to think about with Range Rover top tailgates, though the first is only a worry if you’ve changed or removed either top or bottom tailgate. Do all this with the lower tailgate dropped down, to help access. Many of the fixings will be large cross-head screws. Use a well fitting tool, and take great care not to round any of those off. Corrosion in the frame, catches or operating rod mechanism can cause issues, so start with a clean, well lubricated system.
The first point to check is the height of the top tailgate. It should be adjusted at the hinges so the tailgate is square in the rear body frame, and closes without hitting the lower tailgate. It sounds like yours is already on the car, so it should be set about right, unless you’ve replaced the lower tailgate recently.
After that, we have to deal with the strikers on the body, the catches on the tailgate, the operating rods across the bottom edge and the release handle.
I’d start by looking at the catches, one at a time. Each catch has a release arm that comes inside the frame, which one end of the operating rod threads into. By adjusting how much of the release arm is threaded into the operating rod, the whole arm lengthens or shortens, altering when the catch operates.
With either catch, push in the catch tab – it should stay locked. If it doesn’t, adjust the catch on the operating rod until that one stays in the locked position when the catch tab is pushed in. When it does, check that pushing the handle button then releases the catch. Once you have one catch behaving like that, repeat the whole procedure with the opposite catch.
Now when you press the handle release, it is likely the catches will release at different times. Again, pick one catch, and adjust it on the operating rod until it matches the opposite side when you press the release. Count the adjustment turns as you go, and if you struggle to balance it to around half a turn, perhaps try slight adjustment on the opposite side.
When you have the catches locking and unlocking acceptably, try lowering it and gently offer it to the strikers. They are adjustable, and should slide into the catch without fouling, engaging the catch tabs. If they foul the body of the catch, adjust the strikers by backing off their screws and moving them up or down until they stop fouling, and then engage as they should.
Next, try closing the tailgate, checking each catch engages over the striker, and then locks. If one doesn’t, try raising that striker towards you, so it engages sooner, and it should work well. Once you get it engaging closed, remember to tighten the lock nuts on the operating rod ends.
This is the method I’ve always used to adjusted mine. With a little patience and some methodical working, counting turns on the catch adjusters, you should be able to get each element working as it should.
Rather than using the central handle, I find the best way to close them is a push with a palm on one corner, then the other. Slamming with the handle can bend the frame, meaning the catches start to struggle to engage, causing harder slams, which in turn leads to engagement problems to get worse and so, on.
Like to have your own Land Rover library?
Try our All-Access Digital Subscription. You'll get access to over 7 years of Land Rover Monthly – that’s more than 100 issues plus the latest digital issue. All issues are fully searchable so you can easily find what you are looking for and what’s more it’s less than 10p a day to subscribe. Click the link above to find out more details and start enjoying all the benefits now.