


01 July 2018
|

There are fewer service jobs needed on later models but, as Dave Barker explains, Freelander 2 makes up for that with a couple of very awkward filters
Time: 3 hours
Cost: The cost of servicing varies. The A-service can be from around £180, and a B-service around £225. • Oil: 5.9-litres semi synthetic 5w-30 • Oil Filter: £1.50 to £10 (LR001247) • Sump Drain Plug washer: £1 (LR006295) • Fuel Filter: £17.50 - £38.50 (LR001313) • Air Filter: £2.40 to £19.60 (LR005816) • Pollen Filter: £2.40 to £19.50 (LR019192)
Difficulty: 2/5 stars
Tools needed: General workshop tools, including 10, 13, 21 mm spanners/sockets, hex 5 mm and Torx 25 sockets, 27 mm spanner/socket to unscrew the oil filter housing.
Contact: Maddison 4x4, Water House Farm, Station Road, Topcliffe near Thirsk, YO7 3SG. 01845 587407, maddison4x4.com
Work safely: Before working under a vehicle supported on a lift, ramp or axle stands, ensure the lifting and supporting equipment is correctly rated for the weight of the vehicle and in safe, serviceable condition, and ensure the vehicle is stable.
• Always wear protective gloves and appropriate masks and clothing. Wear eye protection when working overhead beneath the vehicle.
• Road test the vehicle with caution after the work is completed.
• Ensure the engine is fully cold before removing the coolant filler cap, and always unscrew slowly in case of residual pressure.
A routine service carried out correctly and in accordance with the vehicle manufacturer’s procedures and service schedule should generally keep any vehicle running correctly. During a service, along with the normal oil and filter change, a number of other items are also checked over and inspected for wear or damage. Often this means spotting problems before they develop and eventually cause the vehicle to fail. Although servicing can only be a good thing, it’s important to ensure that the work and components used comply with the conditions of any vehicle warranty.
The annual service on the later models, such as this 2013 model year Freelander 2 diesel, has become simpler than we are used to on the pre-2000 models. It’s often now little more than an oil and filter change and a general inspection. But later cars often afford less space for working access, and even simple items that need changing, such as the oil filter, are often difficult to reach, and even draining the sump means first removing an engine undertray. On a modern car one of the main DIY issues is resetting the service warning light or message displayed on the instrument panel. The Freelander 2 has such a warning message, informing the owner of the number of days in which a service is due then, after the due date, it shows the number of miles covered since the service became overdue. To reset this warning message the Freelander needs to be connected to suitable diagnostic test equipment to have the message cancelled electronically.
Land Rover recommends the Freelander 2 is given an A-service every 12 months or 15,000 miles (whichever comes first), and B-service every 24 months or 30,000 miles (at 150,000 miles the engine ancillary belt and cam belt are renewed, and the transmission and rear diff oils are changed at this mileage or ten-yearly, whichever comes first). The main differences between the A and B services are that on the A-Service the engine oil and filter and the pollen filter are replaced and the Freelander inspected. During a B-service, in addition to the items in the A-service, both the fuel and air filters are changed. However, at Maddison 4x4, experience has shown that, for the difference in cost, it’s best for customers if they carry out a B-Service each time, especially considering that the fuel and air filters (scheduled for change every 30,000 miles) show signs of dirt and blockage after only 15,000 miles. The work detailed here completes the B-service.
PART 1: Oil and filters
Changing the air filter

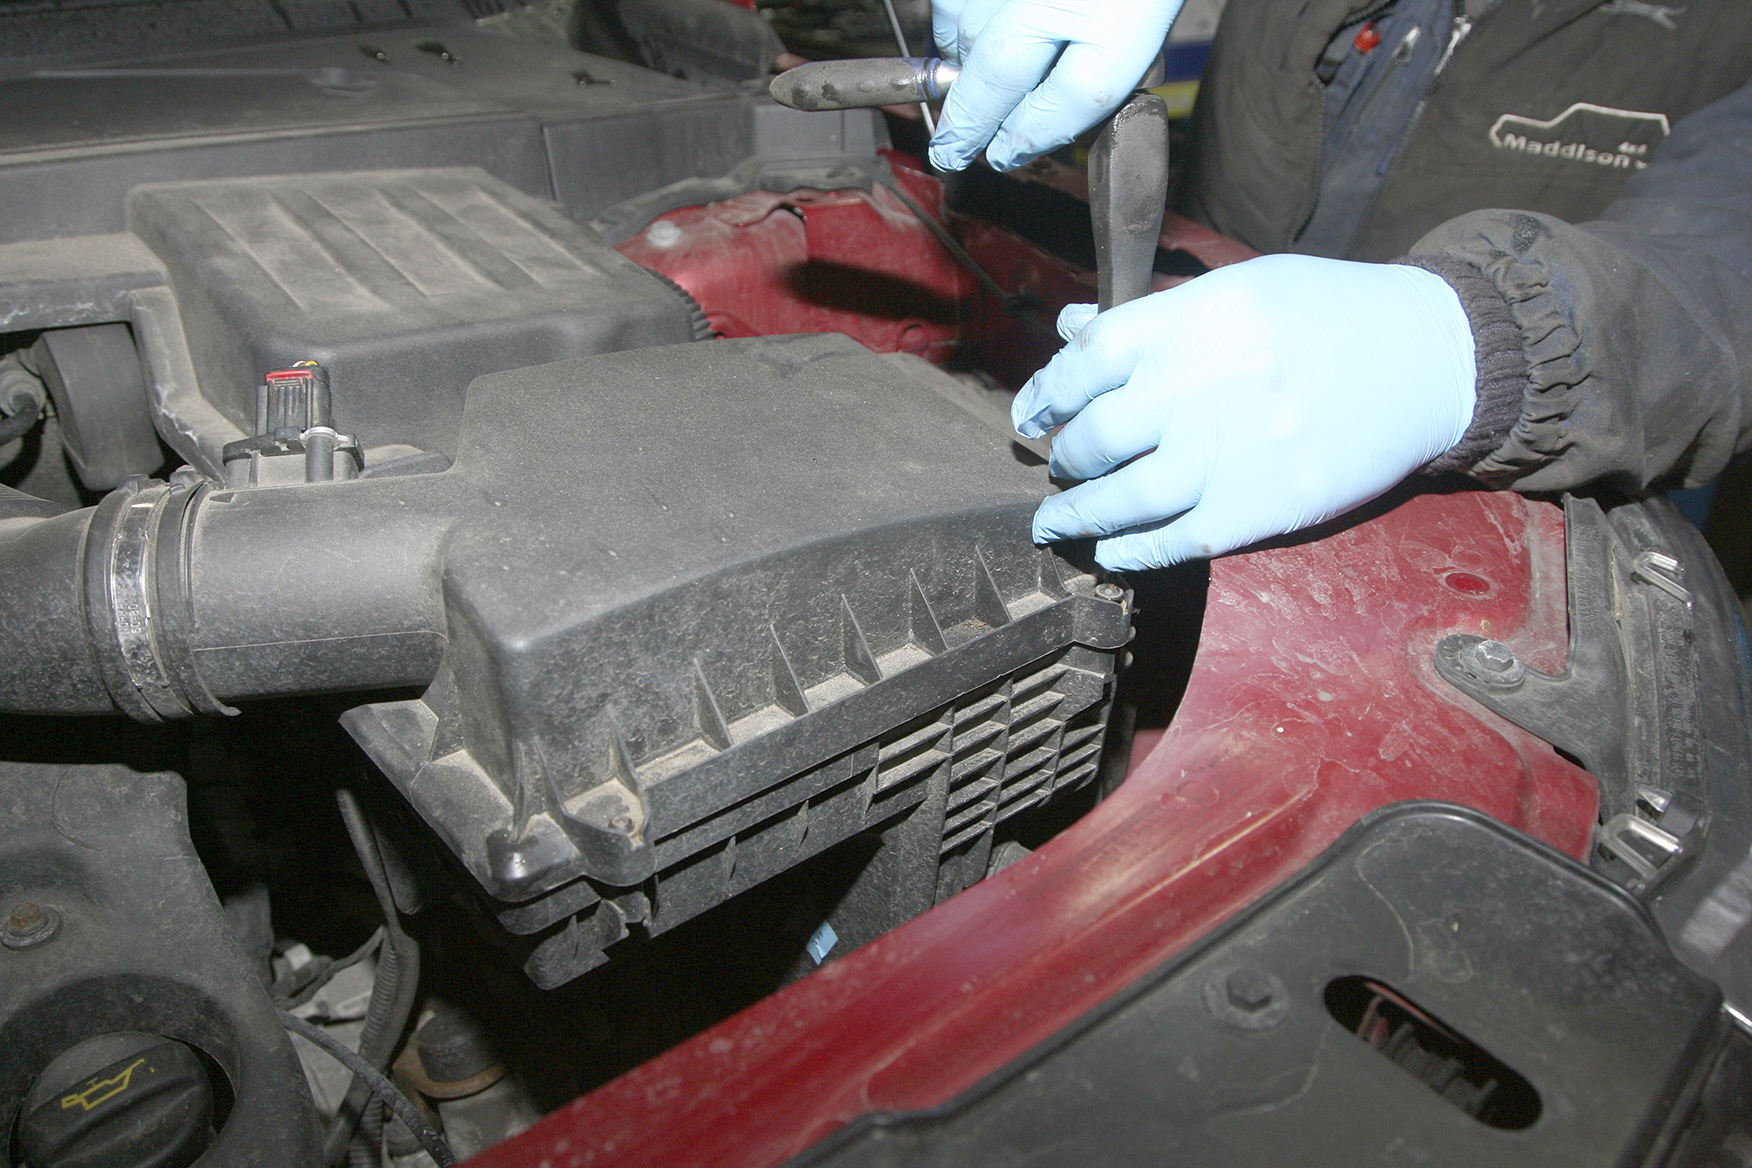
To replace the air filter element you will first need to unscrew the four retaining screws that are holding the top of the air filter housing in position.

You should now be able to lift the top of the cover up far enough to be able to remove the air filter element from the housing.
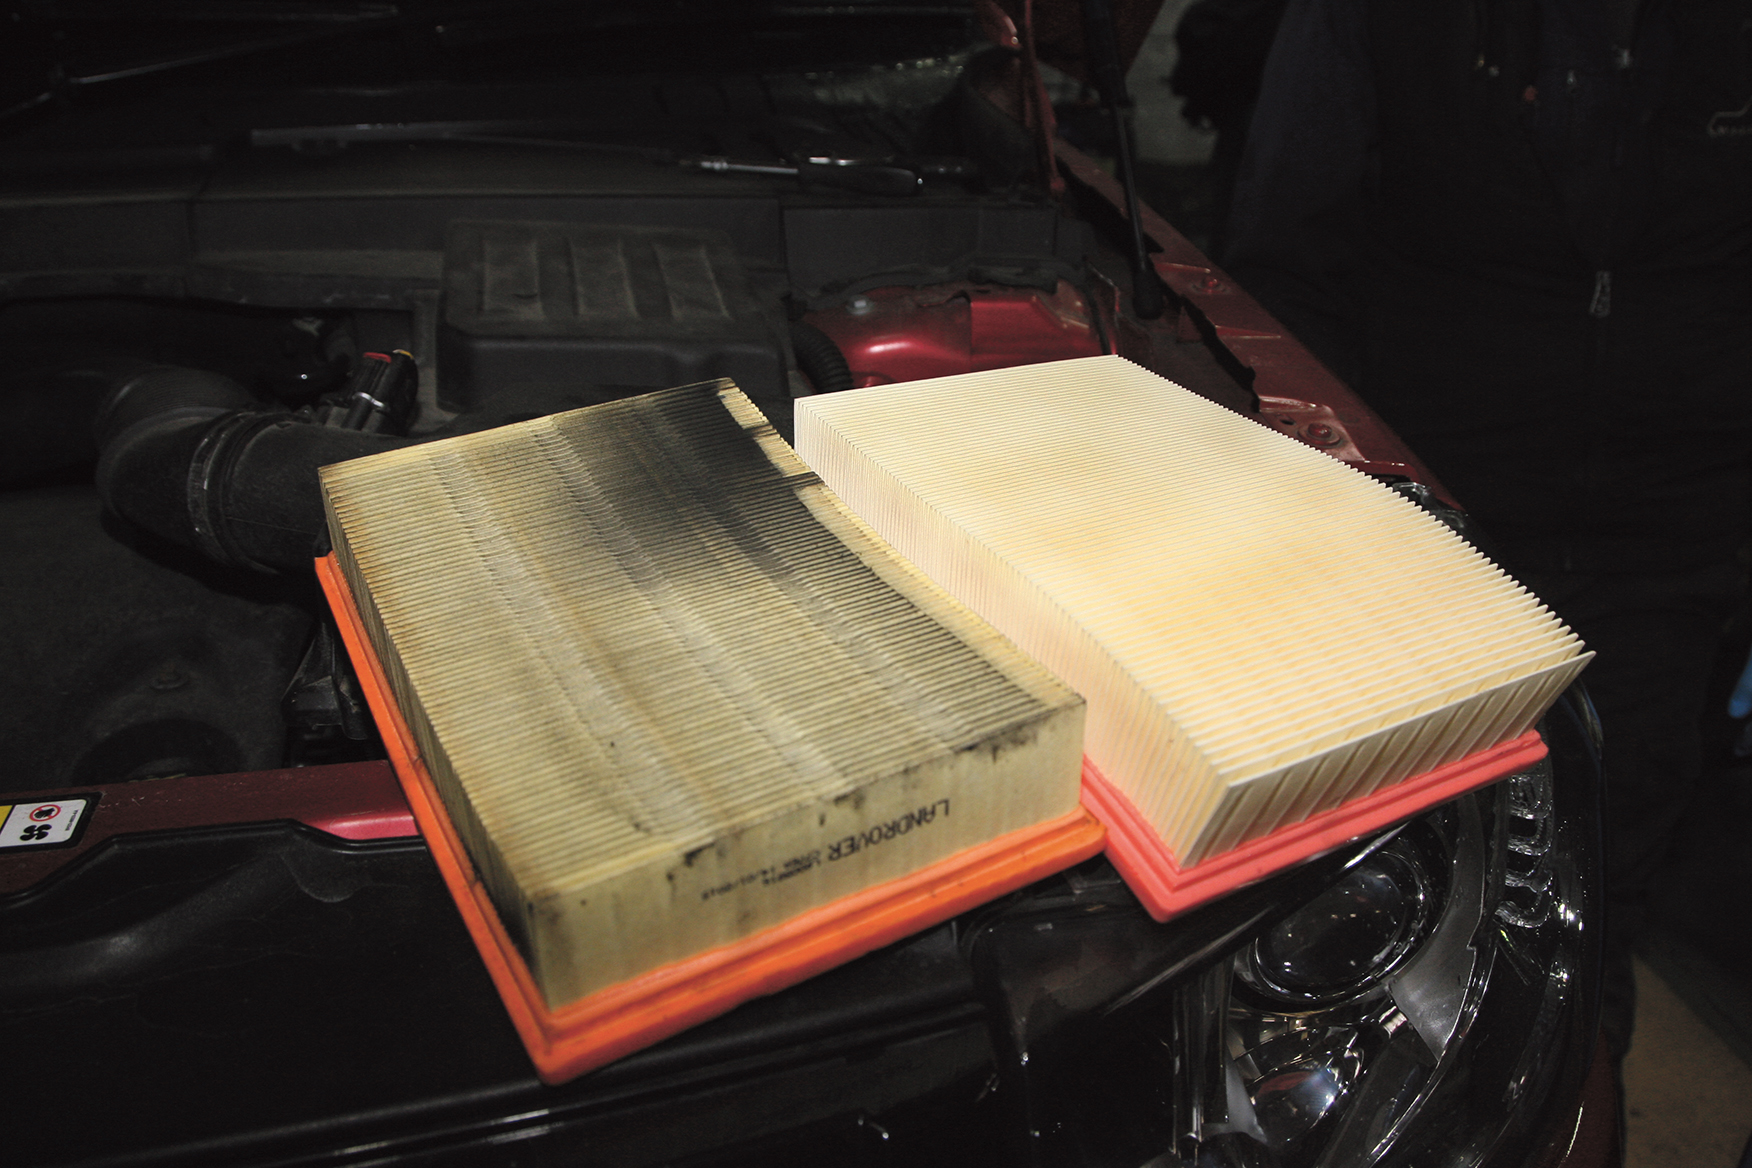
With the old air filter laid side by side with a new filter, you can clearly see the amount of dirt trapped in the old filter, even after just 15,000 miles.

Here’s a filter that has done the prescribed 30,000 miles, which shows why it is better to change this filter after just 15,000 miles.

Once the air filter element has been removed, check the housing itself for any debris and remove if necessary, and wipe the housing clean.

Slide the new filter element into position into the filter housing, make sure that the new filter is sitting correctly around the edges of the housing.
Refit the air filter housing cover into position, check that the cover is correctly fitted around the edges then refit and tighten the four retaining screws.
Changing the fuel filter
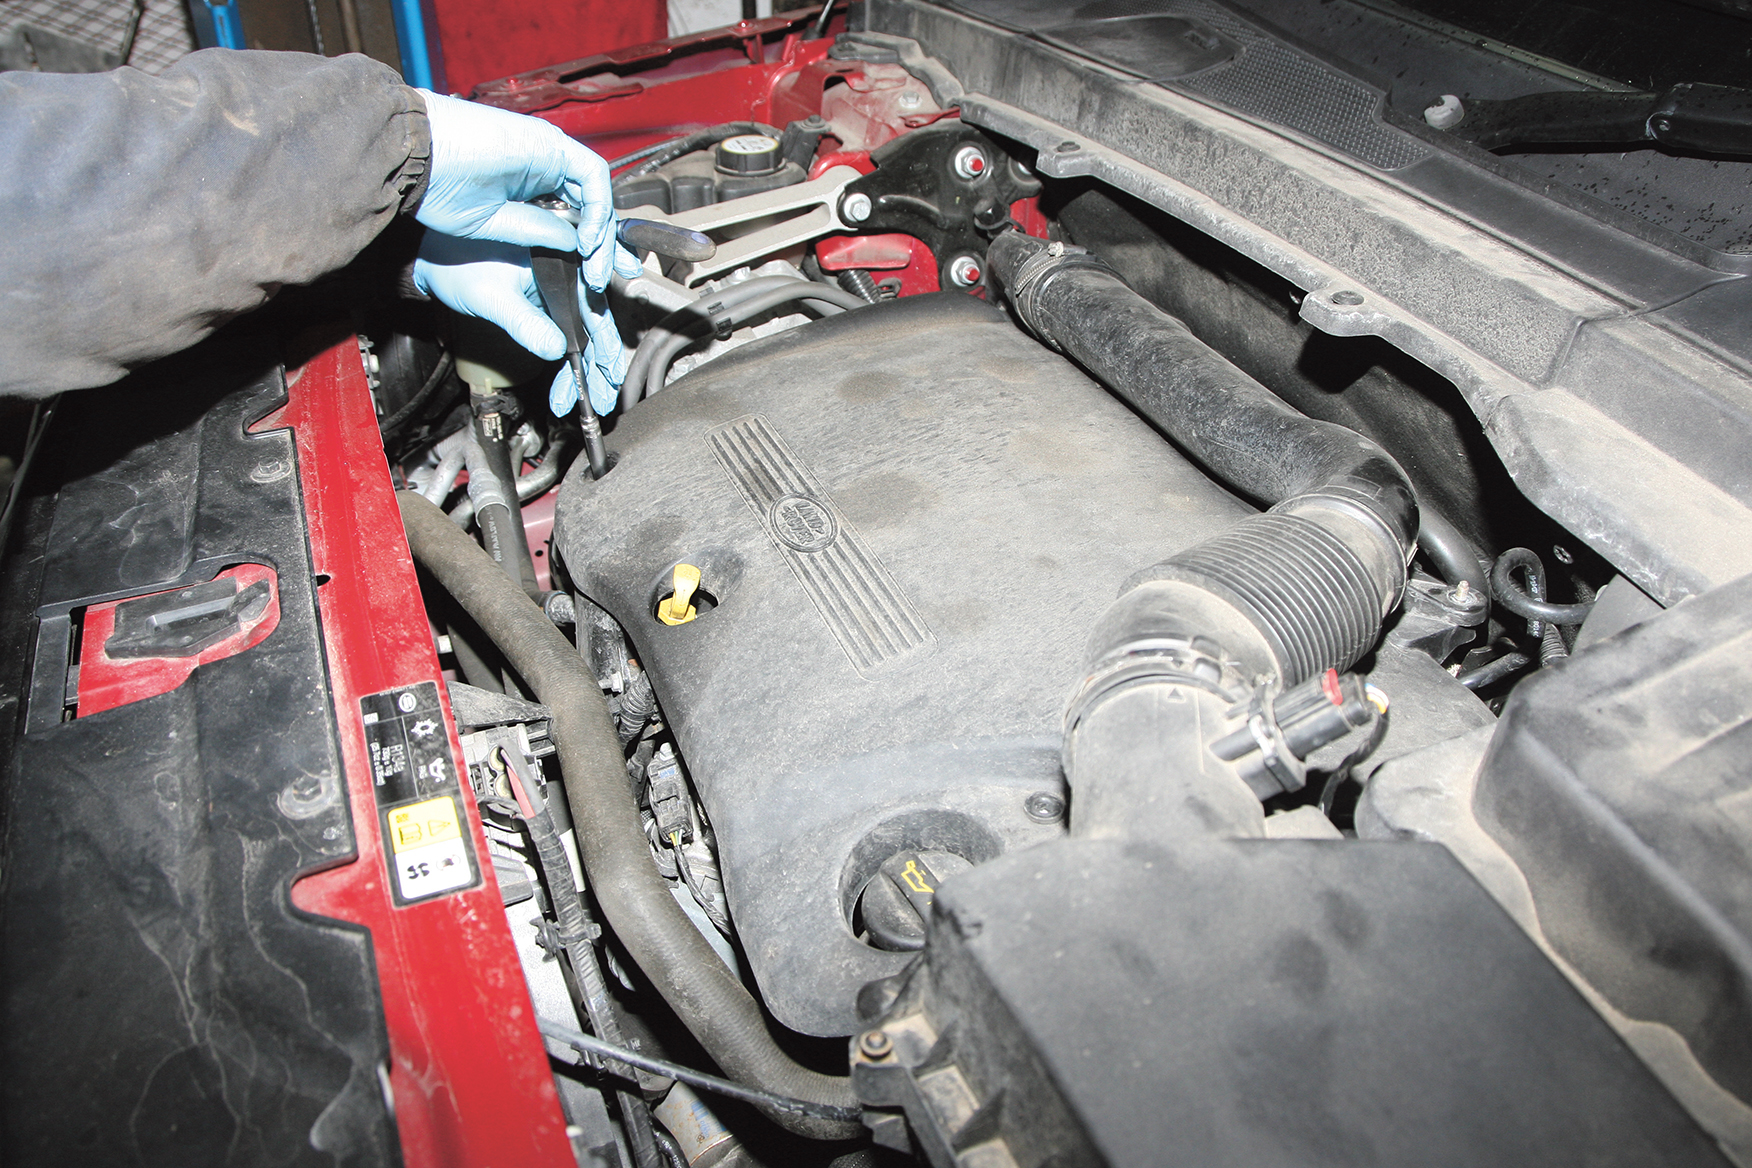
To access the fuel filter assembly, first remove the engine top cover which is secured by screws; once removed lift the cover off the engine.

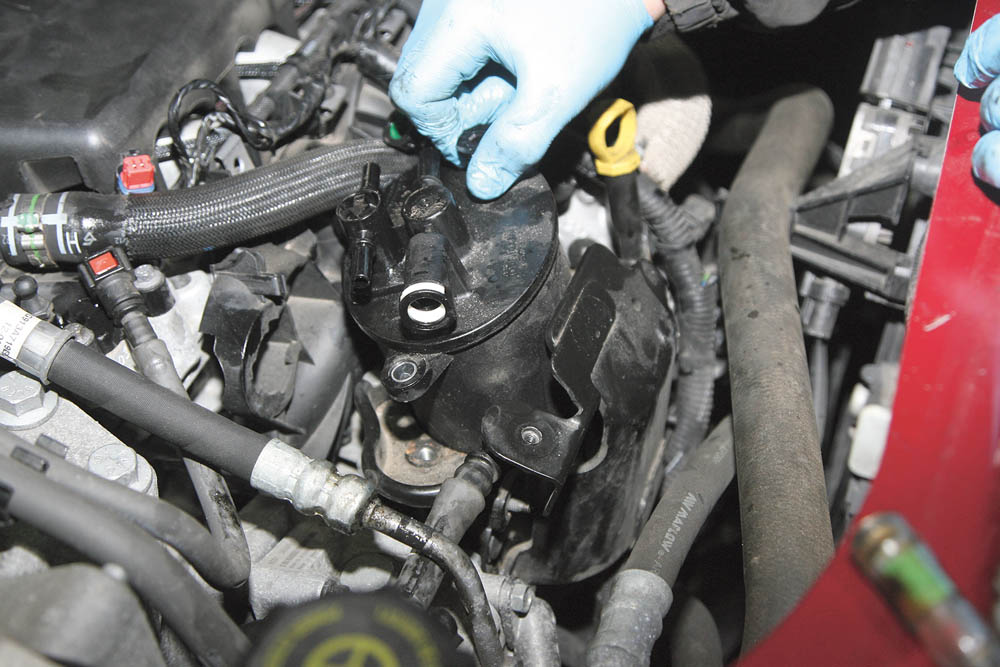
With the engine cover now removed, you can see the diesel fuel filter which is located at the front of the engine and behind a mounting bracket.
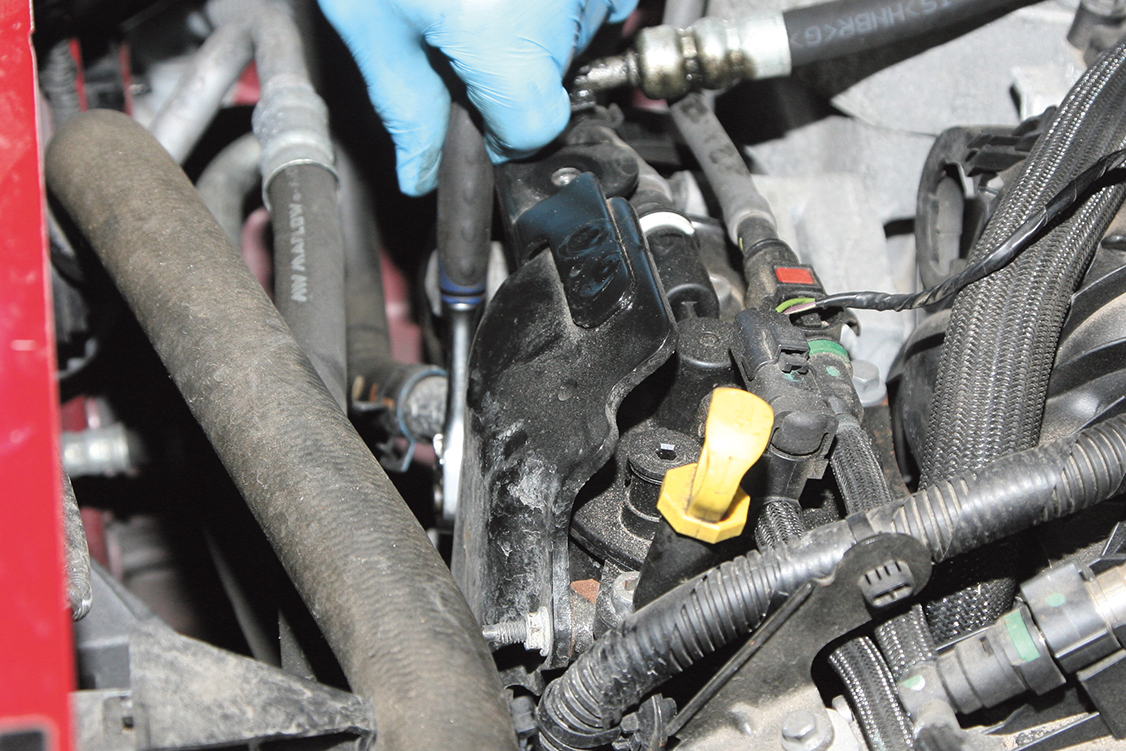
The mounting bracket needs to be moved forward to access the filter; loosening the securing nuts will allow you to pull the bracket forward enough.

Located on one of the fuel pipes on top of the fuel filter assembly is a wiring harness multi-plug which needs to be disconnected.

The filter assembly is secured into position by three bolts. Remove the bolt that is located at the front right-hand side of the filter.

All the fuel supply and return pipes have simple push-fit quick-release connections. Disconnect all four of the fuel pipe connections.

The remaining two bolts securing the filter in position are located on the left side and at the rear of the filter; unscrew and remove them.
With all three securing bolts now removed and the pipes disconnected, you can lift the fuel filter assembly out from its mounting.

Before removing the filter, release the multi-plug on the underside of the filter assembly base. The arrows show the multi-plug (right) and socket (left).

There’s a small clear plastic drain pipe that needs to be pulled off from the base of the filter assembly. With these removed the filter can be lifted fully out.

When fitting the new filter, note that European-spec models have no
electrical connector on the bottom, so plug is pushed into the housing.

Connect the drain pipe, bolt the new filter and its mounting bracket in place, then push-fit the pipe connectors, ensuring they are fully locked in position.

The Freelander 2 fuel system does not self-prime so it will be necessary to pump fuel into the filter using a hand pump or a suction pipe.

Once the Freelander is running again, you can check if air is still in the fuel system by looking for bubbles in a clear plastic section of fuel feed pipe.

After checking everything is correctly positioned and that fuel is flowing correctly, any fuel spillage is cleaned up and the engine cover refitted.
Changing the engine oil and filter
Because of where the oil filter housing is located on the front of the engine behind the radiator, it’s difficult to access the filter housing and then to get a spanner or socket onto the large moulded nut to either undo or tighten the housing. Either a low-profile socket or a specially bent 27 mm spanner is best used to unscrew, and then another spanner bent the other way to tighten the filter housing back into position after its element has been replaced.
Strictly, the filter housing should be tightened to a specified torque setting, but it’s barely possible to get a simple spanner onto the nut let alone a torque wrench. Just make sure it’s tight enough to stay put, remembering the casing is plastic.
It’s normal to finish off underneath the engine by re-fitting the sump drain plug and the engine undertray. Alternatively, it’s useful to leave the undertray off until the sump has been refilled, so the drain plug can be checked for oil leakage.
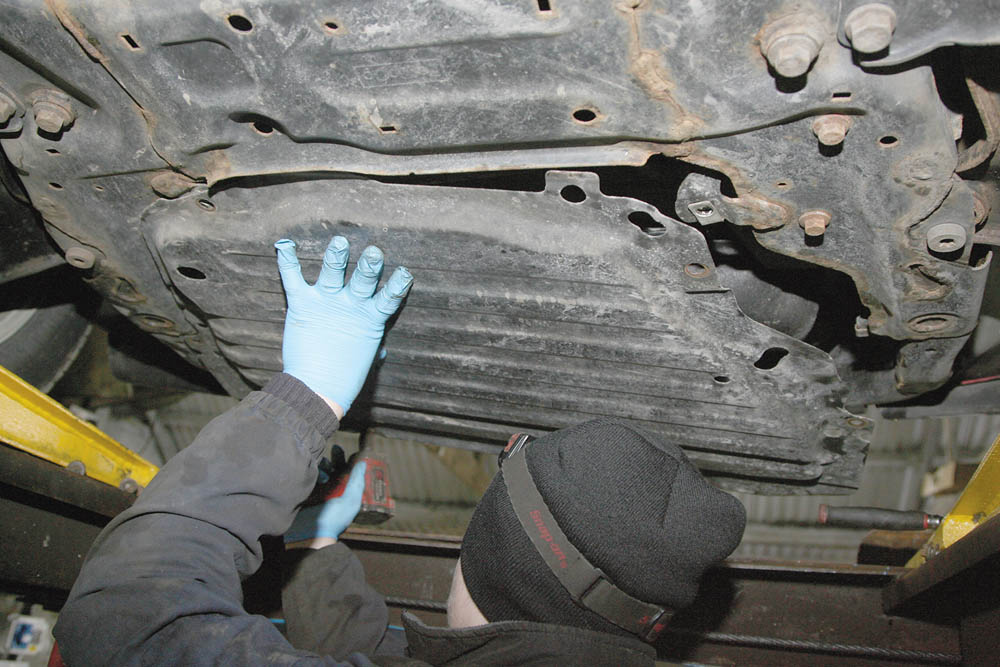
With the Freelander safely raised and secured, remove the engine undershield which is held by six bolts, to gain access to the sump oil drain plug.

Remove the engine oil drain plug from the sump and drain the old engine oil into a suitable container and dispose of it at a recycling centre.

Once all the oil has drained out, fit a new sealing washer onto the drain plug and refit it into the sump and tighten to the correct torque setting.
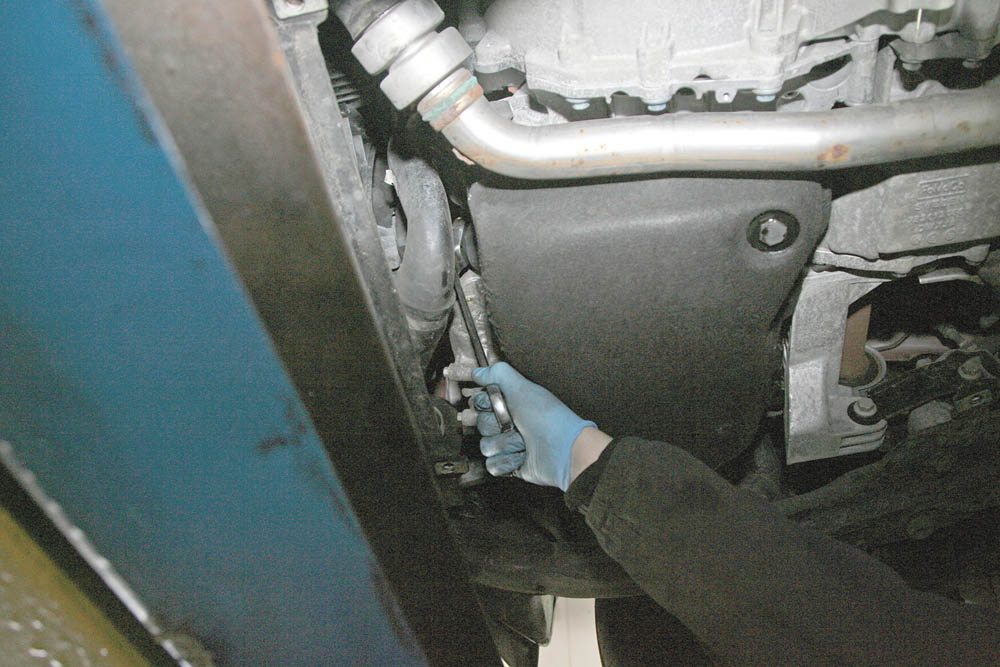
The oil filter housing at the front of the engine was reached from below to turn the large nut on the housing and release the assembly.

Alternatively, some people prefer to access the oil filter housing from above, which is perhaps more convenient, but is still a difficult reach.

These two purposefully bent 27 mm AF ratchet spanners were used to unscrew and re-fasten the oil filter housing from underneath.

Another option for dealing with the oil filter casing is a shallow 27 mm socket spanner fitted to a flexible ratchet head – trickier to fit on.

When unscrewed, remove the assembly from the Freelander, but try to keep it upright to prevent oil spillage (here removed from underneath).

The paper filter element is pulled out from the filter housing assembly over a bowl to catch oil. It’s often tight and may need carefully prying out.

The O-ring seal needs to be pulled off from the filter housing and a new seal (supplied with the filter element) carefully pulled over the threads and seated.

Be sure to fit the new element the correct way around, pushing it firmly into place to ensure it is fully engaged into the housing.

Pass the filter housing between the radiator and engine, hand screw it into position, then carefully re-tighten it with the spanner.

After refitting the engine undertray, add the correct amount and grade of engine oil, and re-check the oil level after a brief run of the engine.

The pollen filter is housed behind the fusebox cover in the passenger footwell. Unclip the cover to replace the old filter with a new one.

Once the service is completed, including the checks in Part 2, the service warning message is reset using suitable diagnostic test equipment.
PART 2: Routine checks and extra items
Having completed the engine systems, there are many more checks and special servicing requirements to complete, as Ed Evans explains
We’ve now completed the more complex jobs of the service, but there is plenty more to check through before we are finished. Checks of brake fluid, power steering fluid and coolant levels, tyre pressures, lights and general performance should all be made on a regular basis, in addition to being checked during the service. To complete the B-service for a vehicle undergoing normal use, the additional checks listed below should also be made. For vehicles subject to harsh use or tough driving conditions, the service intervals should be reduced in accordance with the Land Rover service schedule.
Additional underbonnet checks
Battery: Check that the battery terminals are tight and the battery is secure.
Engine coolant: Check the coolant level only when the engine is fully cold. If the coolant needs topping up, the loss needs investigating. Top up with a 50 per cent solution of the prescribed anti-freeze type. The coolant should be renewed every
ten years.
Drive belts: Check the ancillary drive belt for signs of cracking and polishing, and test the tension. The ancillary drive belt, and the camshaft drive belt plus tensioner and pulley, should be replaced every 150,000 miles
Internal checks
Seating: Check the front and rear seats are secure on their mountings. If there is movement, the lower trim panels can be removed to access the Torx head mounting bolts on the front seats.
Seat belts: Test all of the seat belt mountings for security. Pull the webbing fully out to inspect it for damage such as cuts and fraying of the edges, then confirm each belt fully retracts. Fit each belt to its buckle – it should enter and lock easily, and should spring out freely on pressing the release button.
Driver controls: With someone standing outside, test the operation of all lights, including stop lights, indicators, hazards, and front and rear fog lamps. Then switch the ignition off and back on and observe that all instrument panel warning lamps illuminate, and that all extinguish after starting the engine (ABS may stay on until the vehicle is driven).
Pollen filter: Replacing the pollen filter will ensure the air coming in is clean and has a good airflow.
Exterior checks
Wipers: Examine front and rear wiper blade edges for damage and deterioration and check the arms and blades are secure. Top up the washer fluid with a suitable solution to prevent smearing, and freezing in winter.
Door, fuel and bonnet fittings: Confirm each door, including the tailgate, opens and latches shut easily using the handles outside and inside, and that the fuel filler latches shut. Lubricate all hinges and catches including the bonnet fittings.
Underside checks
Driveline: Transmission and rear differential oils should be renewed every ten years or 150,000 miles, whichever is soonest. Check the engine and driveline for oil leaks, and axles for split rubber gaiters. Examine the clutch fluid pipes on manual models for corrosion, physical damage and fluid leaks.
Fuel, exhaust and electrical: Check the exhaust and fuel piping for leakage, abrasion and security, and confirm electrical cables are secured and are not chafing against metal parts.
Steering and suspension: Examine power steering pipes for abrasion and corrosion, and hoses for abrasion. Check all steering fluid components for leakage and split rubber gaiters. All suspension and steering fixings should be checked for security.
Wheels off
Tyres: With the wheels removed, inspect each tyre on both sidewalls for bulges,
cuts and abrasion. Check the tread thicknesses are comfortably within the legal limit and that tread wear is even across each tyre (if not, check for suspension, steering and alignment defects). Confirm the tyre pressures.
Wheels: Inspect for kerbing and other impact damage on both sides of each wheel. Before refitting the wheels, clean the centre which locates on the hub spigot and apply a thin smear of grease to prevent the wheels seizing to the spigot. Wheel nuts are tightened evenly to 133 Nm.
Brakes: Inspect the front and rear brake pads for wear, and the discs for grooving. Unequal wear on the pads of one caliper may be caused by sticking slide pins. Look for evidence of fluid leakage from the pipes, hoses and calipers, check for signs of chafing on hoses and corrosion on pipes. Check the park brake is working correctly. Land Rover servicing schedules recommend replacing the brake fluid every three years and the brake hoses every six years.
Road test
Whenever a car has been worked on, always drive with extra care for the first few miles, monitoring brake and steering feel, and being alert to any warning lights that might appear on the instrument panel. After a few miles, and when the engine has fully cooled, re-check the engine oil level, and the coolant level if it has been replaced.
Budget Digital Subscription
Get access to over 7 years of Land Rover Monthly – that’s almost 100 issues plus the latest digital issue. The issues are fully searchable so you can easily find what you are looking for and what’s more it’s less than 10p a day to subscribe. Click here and start enjoying all the benefits now.