


09 March 2023
|
 Trevor's ongoing Defender project turns it's attention to the battery compartment
: credit: © Trevor Cuthbert
Trevor's ongoing Defender project turns it's attention to the battery compartment
: credit: © Trevor Cuthbert
Trevor beefs up the 110’s battery compartment before fitting new earth leads and installing the battery with an isolator switch
Need to know
Time: 2 hours.
Cost: £33.
Difficulty: 3 out of 5
Models: All Series and Defender.
Tools needed: Hydraulic crimping tool, side cutters, spanners and socket wrenches, sharp craft knife.
Parts & costs: Battery main switch 250 amp, £30 from CJ Collins Auto Electrics; 50-10 and 50-8 terminals, 50p each from CJ Collins Auto Electrics; Battery cabling available new (used old cable here).
Work safely:
• Disconnect the battery before work begins.
• Ensure crimps are correct and secure.
• Ensure the isolator switch cannot be inadvertently switched off by passenger movement or any other accidental possibility
• Have your work checked by a professional if you have any doubts.
Contacts: CJ Collins Auto Electrics, Doagh, Co Antrim, N.Ireland. Tel: 02893 352556.
See also Trevor's previous Project Defender Td5, parts 1-8, in our How-to section.
Before fitting the new battery isolator switch, plus the battery itself and the necessary earth leads, I needed to repair the battery compartment inside the seatbox assembly, and then fit the seatbox to the rolling chassis.
The original battery compartment from the 110 was rusted and a few holes had formed, so this was repaired in much the same way as the bulkhead which was detailed in part six of this series in the August issue. I then had it galvanised at the same time as the bulkhead.
Repairs to the battery compartment
The battery compartment was removed from the seatbox assembly by drilling out the securing rivets so that the rust areas could be cut out on the bench and new metal welded in (as with the bulkhead).

Saved it: The Defender battery compartment commonly succumbs to rust and often needs to be replaced. This one proved to be repairable, as it wasn’t too far gone.

As good as new: The front edge and lower floor section of the battery compartment had new steel welded in place after the rusted areas were cut back to clean metal.

Effortless: The freshly galvanised battery compartment is fixed to the seatbox by a series of blind rivets. The air rivet gun makes short work of completing the job.

Reunited: As this is the original battery compartment for the seatbox, there was no re-drilling required – every rivet hole lined up perfectly on the two components.

Future-proof: Looking at the underside of the completed seatbox assembly, the repaired and galvanised battery compartment is solid and strong and will last for many years to come.

Reunited: The completed seatbox assembly is now bolted to the chassis, ready to organise and install the electrical connections. It will need readjustment when fitting the main body sections.
Completing the earth system
Ground or earth straps are vital for all vehicle electrical systems. In a Land Rover, the steel chassis, engine block and transmission form part of the electrical system. Electricity flows from the positive terminal of the battery through the electrical equipment, such as lights, and to the negative terminal of the battery via the chassis and engine block which are connected by earth straps to the negative battery terminal.
Given the importance of earth straps, it is essential to regularly check their condition. How many times have you heard the phrase ‘bad earth’ when an electrical problem has been diagnosed or repaired? Worn or damaged ground straps can cause equipment to malfunction or create unsafe conditions. Some signs of bad earth straps are: dim or flickering lights, low voltage output, discharged or non-charging battery, slow engine cranking.
The earth strap cable from this Defender 110 is a type common to Defenders since the 200Tdi models. The cable terminates with the battery clamp attached to the negative terminal of battery. Partway along the cable there is one 8mm terminal which is bolted to the chassis at the gearbox crossmember, and then a 10mm terminal at the very end which is bolted to the transmission.
This cable on the 110 needs to be replaced because of its poor condition and I also want to fit a main battery isolating switch so I can fully disconnect the electrics when the Land Rover is not being used. There are two reasons for this. First, the Defender may not be used for several weeks at a time, so any draining of the battery is prevented. The second reason is for safety: there will be multiple additional electrical systems installed, so it is good to be in a position to quickly isolate the battery in the unlikely event of something going wrong.

Not confidence-inspiring: The original earth strap, where it attached to the chassis, is in bad shape. The terminal is loose on the copper cable and the cable has fractured strands.

Doing it in stages: An alternative earth cable that will electrically connect the chassis and transmission is offered to the gearbox and marked for cutting to length.

Using the good originals: The 8mm terminal on the cable will be utilised and it is cut to length for a second terminal to be crimped onto the other end.

A boon for any auto spark: This 10-tonne hydraulic crimping tool cost less than £40 and will handle lots of cable types, from very fine right through to heavy welding cables.

Softly held in the vice: The crimping tool, fitted with the correct 50mm die set, is positioned over the new terminal and, when located just right, the handle is pumped.

The gearbox end: The terminal is now permanently fixed to the cable. The code 50-10 inscribed on it indicates that it’s for 50mm square cable, with a 10mm bolt hole.

Connection to the frame: The end of the new cable with the 8mm terminal is bolted to the chassis, utilising one of the existing pre-drilled holes and an M8 x 90 bolt set.

Held loosely in abeyance: The new 10mm terminal end is loosely attached to the transmission using one of the M10 bolts but it is not tightened up at this stage.

Belt and braces: This spare length of cable made an extra earth strap, secured by a convenient bolt on the engine and bolted to an existing hole on the chassis.
Installing the battery isolator switch
Professional auto electrician, Nicky Collins of CJ Collins in Co Antrim, explains that, when installing a main battery switch, he almost always fits it to the negative feed of the battery. The reasoning is simple. Installing a main battery switch involves adding at least two more cables. Sometimes these span some distance (although we can keep them fairly short in a Defender). This introduces additional positive cables running around the vehicle. By making these cables negative, it matters less from a safety point of view if they become damaged or broken.
Further to this, Defender owners often store additional items in their battery compartment, where two positive terminals would be exposed, unless action is taken to insulate them. Once again, by making these terminals negative, it does not matter as much if metal objects inadvertently touch them.
It is essential that the battery isolator cannot be accidentally switched off when the vehicle is being driven, so it must be positioned with this in mind.

Proper rating for diesel engine cranking: A heavy-duty battery main switch was selected, capable of handling a 250-amp load; far superior to the commonly fitted lower-duty red switches (circa 100-amp).

Redundant Disco cable: A good quality disused battery cable was selected to make the second earth strap. Here the 8mm hole is being drilled out to 10mm.

Could be useful: The drilled terminal end now fits the new switch perfectly, although the shape of the terminal will mean careful planning of how it is attached.
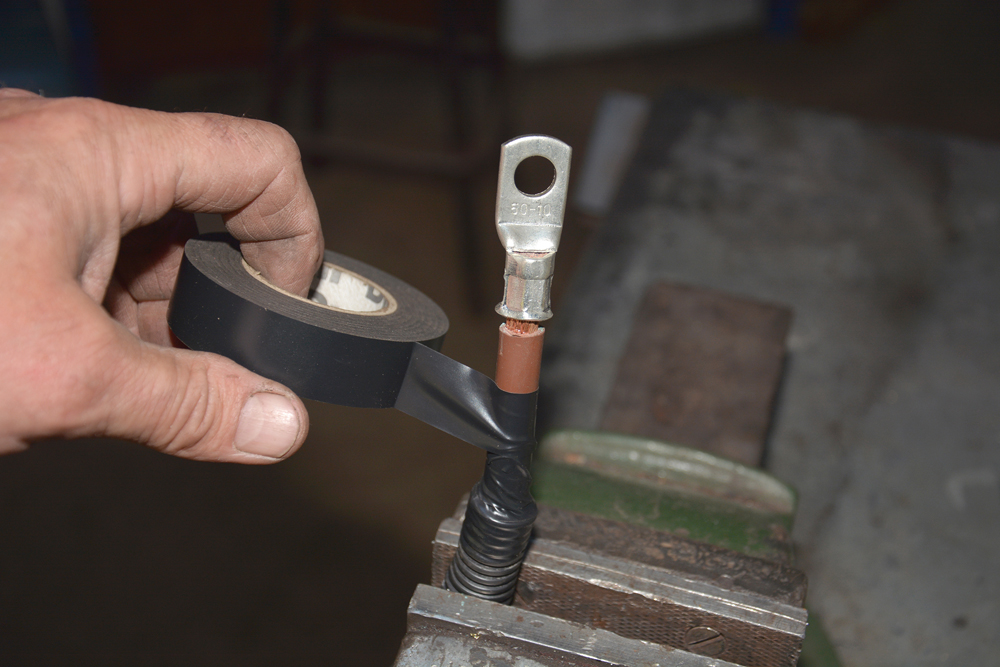
Make earth cables black: After cutting to length, a new 50-10 terminal is crimped on, as before. Brown insulation is covered in black insulating tape to avoid confusion.

Torqued up: The now correctly coloured earth cable is firmly bolted to the transmission, along with the chassis earth strap. The other end will be routed to the battery compartment.

The length is spot-on: The earth cable from the transmission is routed through into the battery compartment, close to the intended location for the isolator switch. A grommet will be fitted here.
The battery isolator switch will be positioned on the front panel of the Defender seat box so that the lengths of cables required are kept to a minimum. It is best to fit the switch close to the transmission tunnel, clear of the passenger’s feet, and with the switch key pointing down when switched on to reduce the likelihood of the switch being inadvertently knocked to the off position.

Drill it out: With the location of the battery isolator switch chosen, a 22mm hole is cut through the front of the seat box, using a hole-cutter or a step drill.

Key fits at 3 o’clock: The battery main switch is bolted with two M6 x 20 bolt sets. The switch protrudes significantly, though spacers could be used to push it back.

Just long enough: A short negative battery cable has been made by crimping on a 50-10 terminal to the remains of the original battery cable that was cut down.

Convenient earthing post: The battery cable has been connected to the lower terminal on the switch, allowing easy access to the top terminal for the connection of additional circuits.
Completing the seat box connections
At the opposite side of the seat box, under the driver’s seat, the engine and body wiring harnesses are fitted into the ECU (Engine Control Unit) compartment ready for connection. The ECU compartment is in good condition and did not need to be repaired (these never seem to rust like the battery compartment does).

Pull them carefully home: The engine wiring harness (red plug) and the body wiring harness (black) are pulled into position in the compartment that holds the ECU, fuse box and relays.

Planning ahead: This additional seven-core cable will be used primarily for cruise control and tachometer wiring, and will be routed to the instrument panel and console.

Reinstated: The fuse box, relays and the all-important ECU are now fitted back in their factory positions and it only remains to find a missing cover for the fuse box.
LIKE TO READ MORE? Try our Budget Digital Subscription. You'll get access to over 7 years of Land Rover Monthly – that’s more than 100 issues plus the latest digital issue. The issues are fully searchable so you can easily find what you are looking for and what’s more it’s less than 10p a day to subscribe. Click here to find out more details and start enjoying all the benefits now.