


19 December 2023
|
 Your thermostat could be preventing your engine running efficiently
: credit: © Martin Domoney
Your thermostat could be preventing your engine running efficiently
: credit: © Martin Domoney
A stuck thermostat can cost you warmth and fuel. Martin explains how to fix the problem
Need to know
Time: 3 hours Cost: £50-60
Difficulty: 3 out of 5
Models: Freelander 2, Evoque and Discovery Sport 2.2 diesel.
Tools needed: Socket and spanner sets, drain pan, torque wrench, E5 Torx socket, hose clamp pliers, hooks, Scotch pad, hose clamps or plastic plugs.
Parts and costs: Thermostat housing 2.2 Td4 (LR001312), £47.99; Antifreeze (STC50529), £9.59 per litre, Island-4x4.co.uk.
Work safely: Raise and support the vehicle securely on rated equipment. Wear the correct PPE at all times. Don’t let children or animals near coolant, and dispose of it responsibly at your local recycling centre.
Ever started an engine on a really chilly morning and noticed how much more sluggish it feels when cold, but smoothes out and gets more responsive after driving a few miles? That’s because engines work best and most efficiently when they are up to their proper operating temperature – on electronically-controlled engines, this is when the fuelling and emissions control systems are operating at their peak efficiency, giving the best performance and cleanest running conditions.
No matter the outside temperature, it’s the job of the thermostat to bring the engine up to running temp, and keep it there. When the engine is cold the thermostat should be closed, so that the coolant can only circulate around the engine itself and the heater matrix. This allows the engine to heat up more quickly, as there is a relatively small volume of coolant to contain the heat. When the engine gets up to temperature – normally halfway on the gauge – the thermostat opens and allows coolant to flow through the rest of the pipework and radiator, managing the heat and keeping the engine at the correct temperature for it to work at optimum efficiency.
If the thermostat sticks, there are two scenarios. If it sticks closed, you have real problems because the coolant will never make it to the radiator, and the temp will continue to climb, potentially causing damage. If it sticks open – a common problem on the 2.2 Td4 engine seen here – the coolant will be able to flow continuously through the radiator, over-cooling the engine. This means the engine may never reach proper operating temp, resulting in a weak heater (although the F2, Disco Sport and Evoque also have an electric element), and an inefficient engine, so performance and fuel efficiency will suffer. Here’s how to sort it.

Pipes and plugs: Start by unclipping the battery cover and setting it aside. Use hose clamp pliers to release the small clamp on the breather pipe and the big one on the intake ducting, then disconnect the MAF sensor and unclip the wiring. Pull the breather pipe free and tuck it out of the way.

Engine cover fixings: Undo the two 8mm screws along the front edge of the engine cover, taking care not to lose the rubber inserts or top hat washers. Use a 10mm socket on a long extension to undo the 10mm nut from the stud at the back, which secures the intake duct to the cover.

Remove the parts: Pull the airbox out of its rubber mounts and remove it – complete with intake ducting – from the engine bay. Pop the engine cover off its grommets along the back edge and lift it off. It’s also a good idea to unbolt and remove the undertray at this point (13mm bolts).

See clearly now: With the plastics out of the way, we can see what we’re dealing with. The Td4’s thermostat is part of a black plastic coolant manifold and can’t be replaced separately. As you can just about see, there’s a total of five pipes, four bolts and an electrical connector to deal with.

Prepare for spillage: Position your drain pan under the car as accurately as possible. Unfortunately, with this job, it’s almost impossible to catch all the coolant – but you can minimise mess by placing rags on top of the gearbox, and stemming the flow from rubber pipes with clamps or plugs.

Smallest pipe first: As we are dealing with plastic and rubber parts in the cooling system that will have been heat-cycled hundreds or thousands of times, it’s important not to force anything. Carefully depress the two lugs on the small header tank overflow pipe fitting, and wiggle it free.

Release hose clamps: Use a proper pair of hose clamp pliers to compress the two tangs on the radiator hoses, and slide the clamps up the pipe clear of the swaged lip on the coolant manifold. The hoses are marked with white strips to show where the clips need to be positioned when refitted.

Tricky blighters: You may notice when compressing the tabs on the clamp, it locks in the ‘open’ position. This may seem like a convenient feature, but they are prone to snapping shut with no warning, so it’s best to avoid doing this. Flick the clamp back shut with a screwdriver if needed.

Cascading coolant: Use a hook tool to break the seal around the two big rubber pipes, and slide them off the ports on the water manifold. Even when clamped, expect coolant to run out – reposition your catcher to minimise mess. Once the flow eases, tuck the two hoses out of the way.

Release the clip: The next pipe to release from the thermostat housing is a smaller plastic one, with a 90-degree elbow on the end. It’s locked in place with a metal spring clip, which needs to be withdrawn to free it. Use a small screwdriver or hook tool to slide the metal clip out.
Easy does it: The pipe is sealed with an O-ring, which may be stuck in place. Carefully wiggle the pipe by hand to get it moving, applying light pressure behind the plastic elbow with a screwdriver or trim tool. Don’t apply excessive force, or you could crack the plastic. Once free, tuck aside.

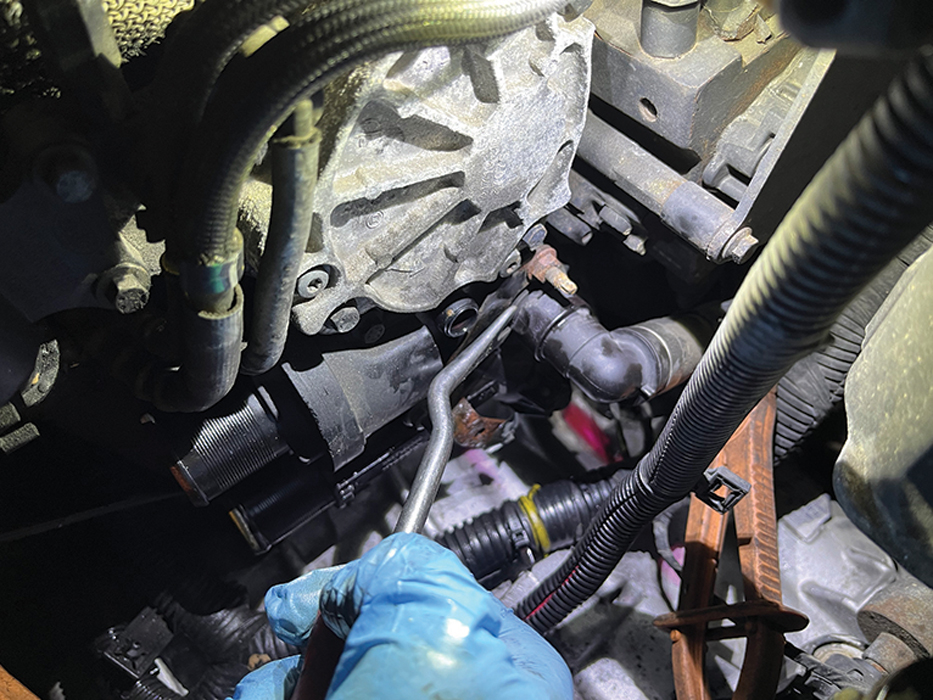
Unbolt hard pipe: The final pipe to release is a metal one that enters the back of the water manifold. It’s held in with a horseshoe-shaped clamp and a single screw. Use a 10mm ratchet spanner to undo the screw, then remove the clamp. Some later cars use a Torx-headed screw instead.

Bracket be gone: Unclip the wiring harness from the small metal bracket on the side of the thermostat housing, then undo the two 10mm nuts holding the bracket onto the studs and slide it off. If your car has been worked on before, like this one, the wiring may have been pre-freed.

Undo nuts and bolts: You’ll notice two more 10mm nuts beneath the bracket you just removed. Loosen and undo them, and then undo the two 8mm-headed bolts that hold the thermostat housing to the side of the cylinder head. Expect more coolant spillage as the seal separates.

Wind the studs out: Because the metal pipe we released earlier is fixed in place, it’s necessary to remove the two studs from the cylinder head to twist and tilt the housing off it. Use a proper E5 Torx socket to wind them out, or lock two 10mm nuts together and remove them that way.

Wiggle and twist: Support the metal coolant pipe with one hand and grasp the thermostat housing with the other. Move the housing up and down and carefully twist it around to release the seal from the hard pipe, and ease it forwards. This would be impossible with the studs still fitted.

Unclip temp sensor: Use a small screwdriver to lift the catch on the coolant temperature sensor connector, and unplug it. The new Mahle thermostat comes with a new sensor attached, so there’s no need to remove the old one and swap it over. Just don’t forget to plug it in when refitting!

Withdraw the housing: The old thermostat housing can now be removed from the engine bay. Depending on what position yours has stuck in, it might be visually obvious where the problem lies. It’s also not unheard of for the plastic webbing in the port to break off and wedge the thermostat open.
Testing a thermostat
Realistically, if you’ve got this far through the job and have the new part on-hand, there’s no logic in refitting the old thermostat. But, if you have an older vehicle with a separate, easier-to-remove thermostat that might have an overheating or over-cooling issue, you can remove it and test it.
Thermostats are essentially a valve. Normally held closed under spring pressure, they have a wax-filled cylinder inside that expands with heat. Once up to temperature, the spring pressure is overcome by the expanded wax and the thermostat opens – in this instance, it starts opening at 83°C and is fully open by 91°C.
So, to test a thermostat, simply boil a kettle and pour the water over the suspect unit until it’s fully submerged. If it’s functioning properly you’ll see it open and then gradually close as the water cools. If it’s stuck, there will be no movement, and the thermostat needs replacing.

Clean mating face: It’s important to thoroughly clean and degrease the side of the cylinder head where the new housing will seal on. Use Scotch pad and brake cleaner or degreaser to break away any baked-on debris and crystallised coolant; don’t use a sharp scraper or you risk gouging.

Fit new thermostat: Clean the rubber seal on the hard coolant pipe at the back of the engine, and smear it lightly with grease. Offer the new thermostat up and slide it carefully onto the coolant pipe until the seal is flush inside the port, and the thermostat seal butts up to the engine.

Studs back in: Adjust the position of the thermostat slightly if needed, then slide the two studs through the housing and start them in their threads. The top one is towards the back of the engine, and the lower one the front. Tighten them both (to 7Nm) with the E5 socket or the 10mm nuts.

Secure in place: Slot the long bolts in, and start them by hand. Spin the two 10mm nuts onto the studs, and gradually tighten all four fixings to compress the rubber seal on the thermostat housing. Continue to tighten the nuts and bolts evenly, finally torquing to 8Nm. Plug the sensor in.

Clamp it up: Position the metal horseshoe-shaped clamp behind the hard pipe at the back of the thermostat, and start the screw by hand. Making sure the clamp stays in the right position, tighten the screw up with a 10mm ratchet spanner or Torx bit in a driver, if applicable.

Continue rebuilding: Refit the two large radiator hoses and secure with the hose clamps, as marked on the pipes. Refit the plastic elbow with metal spring clip and the small header tank overflow pipe, and rinse the area with fresh water. Refit the metal bracket and clip on the wiring harness.

The correct mix: Of course, the coolant that was lost during the water manifold job needs to be replaced. Pour in equal parts neat pink/orange antifreeze and water until the level reaches the maximum marker on the header tank. Check and top up the level after a short drive.

Confirm the fix: Refit the intake pipe and airbox, and connect the breather and MAF sensor. Refit the engine cover and fixings, then go for a drive. The needle should hold a steady halfway on the temp gauge in all weathers, and heater should blow hot. Over time, MPG should improve, too.
Like to have your own Land Rover library?
Try our Budget Digital Subscription. You'll get access to over 7 years of Land Rover Monthly – that’s more than 100 issues plus the latest digital issue. All issues are fully searchable so you can easily find what you are looking for and what’s more it’s less than 10p a day to subscribe. Click here to find out more details and start enjoying all the benefits now.